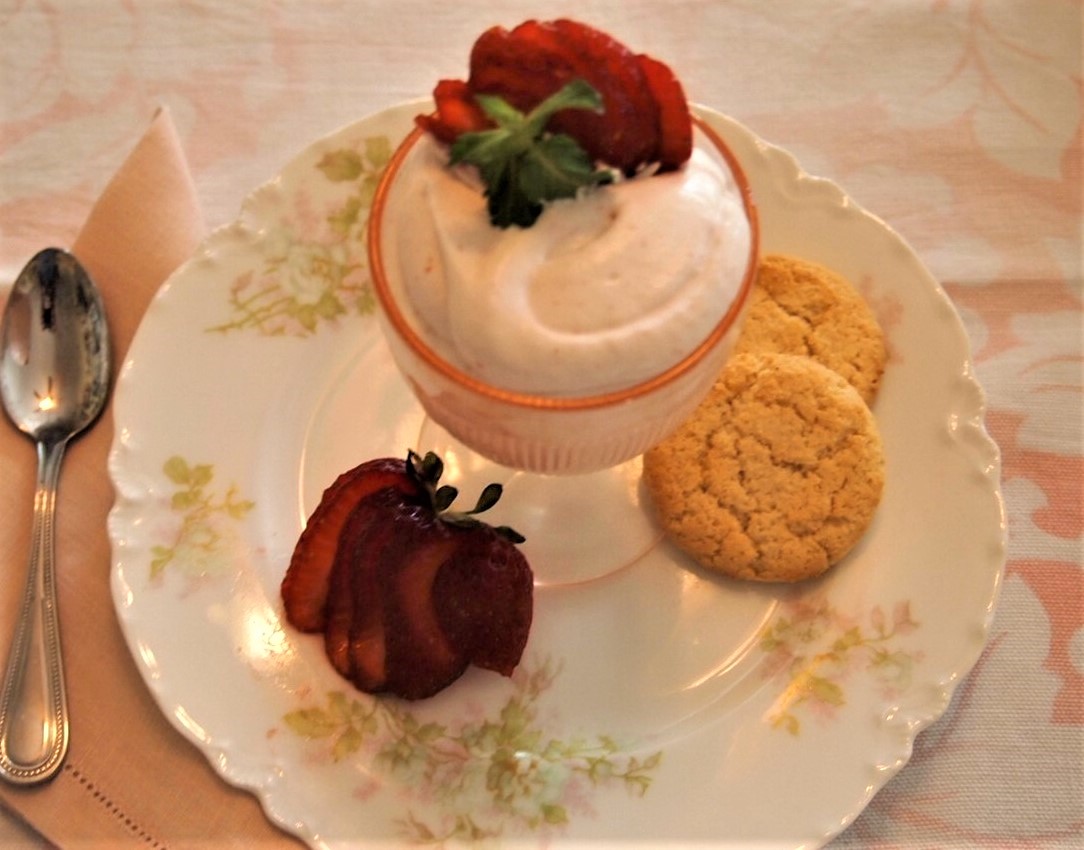
This is the season for amazing strawberries and here is a deliciously light yet decadent dessert. A Strawberry Fool – a fresh fruit dessert. If you haven’t had a fruit fool, you are in for a treat. This is an easy and perfect dessert to end your meal, your afternoon tea, or just to have as a refreshing treat all by itself. I love to serve this in the dessert course for my afternoon teas – its light enough and balances well with your other sweets.
By definition, a fool is an English dessert. Traditionally, fruit fool is made by folding pureed stewed fruit into sweet custard. Modern fool recipes often skip the traditional custard and use whipped cream. For the purposes of this post, we will be using whipped cream instead of a custard. Either is delicious.
Strawberry Fool Ingredients
Fresh Strawberries
Sugar
Whipping Cream
Vanilla
Strawberries and fresh mint for garnish
Creating the Strawberry Puree
For this recipe, I am using fresh strawberries but there are many variations to this recipe that I will touch on later in the post.
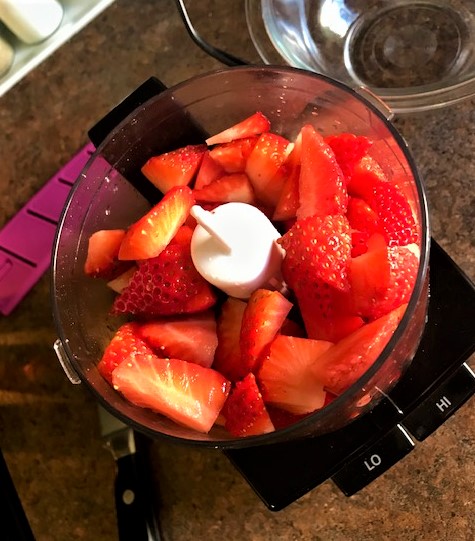
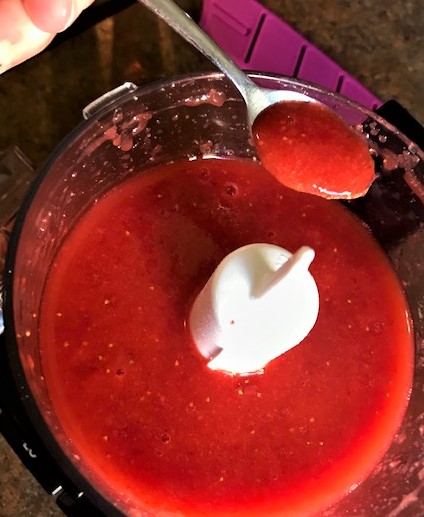
Take 2 cups of fresh strawberries and add the sugar, puree them in your food processor or blender. Then strain the puree through a mesh strainer or sieve to remove the seeds. Set this aside. You can also do this ahead of time and keep in the refrigerator or even freeze till you are going to use it.
Strawberries in processor
Puree prior to straining
Prepare the Whipped Cream
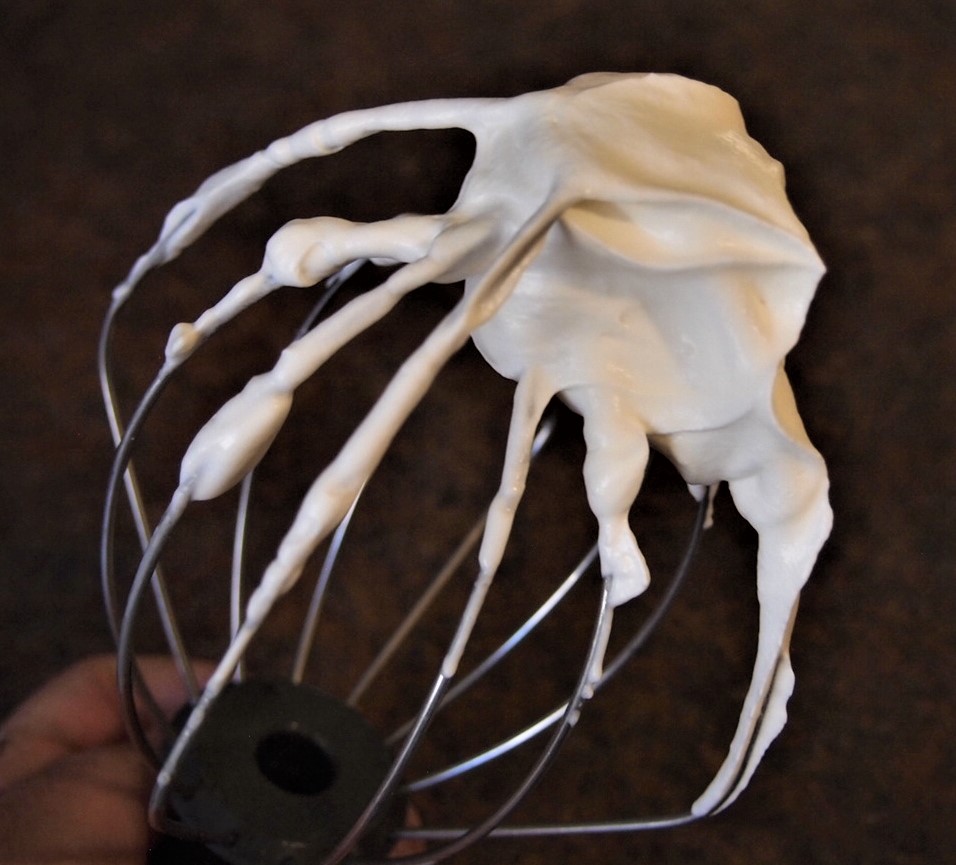
Always chill the bowl and whip that you will be using to make your whipped cream. I stick it in the freezer for a bit till its really cold. Make sure your whipping cream is cold as well.
Whipped Cream Stiff Peaks
Add the vanilla and whip the cream until stiff peaks. Your whipped cream should be able to stand up on its on when you lift the whip upright. Remember that you will be adding the puree to the whip cream, so the stiff peak will be relaxed just from the folding and addition.
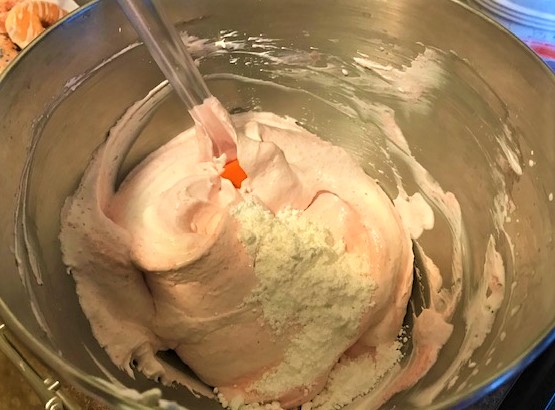
Filling your dishes
Now that you have the puree completed and the whipped cream ready, gently fold the puree into the whipped cream without deflating the whipped cream. You can completely mix through or you can leave streaks in the whipped cream. Its up to you!
Folding the strawberry puree into the whipped cream
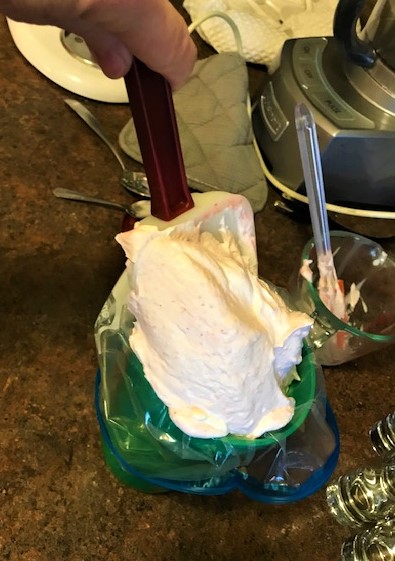
Once done, place your fool into a piping bag without a tip. Or you can use a gallon size Ziploc bag as well. I please the bag in a cup to fill – helps to keep it upright and is easier to fill. If using a Ziploc bag, just snip off the end to allow you to pipe the fool into your serving dish.
Completed fool into bag
Ready to fill shooters
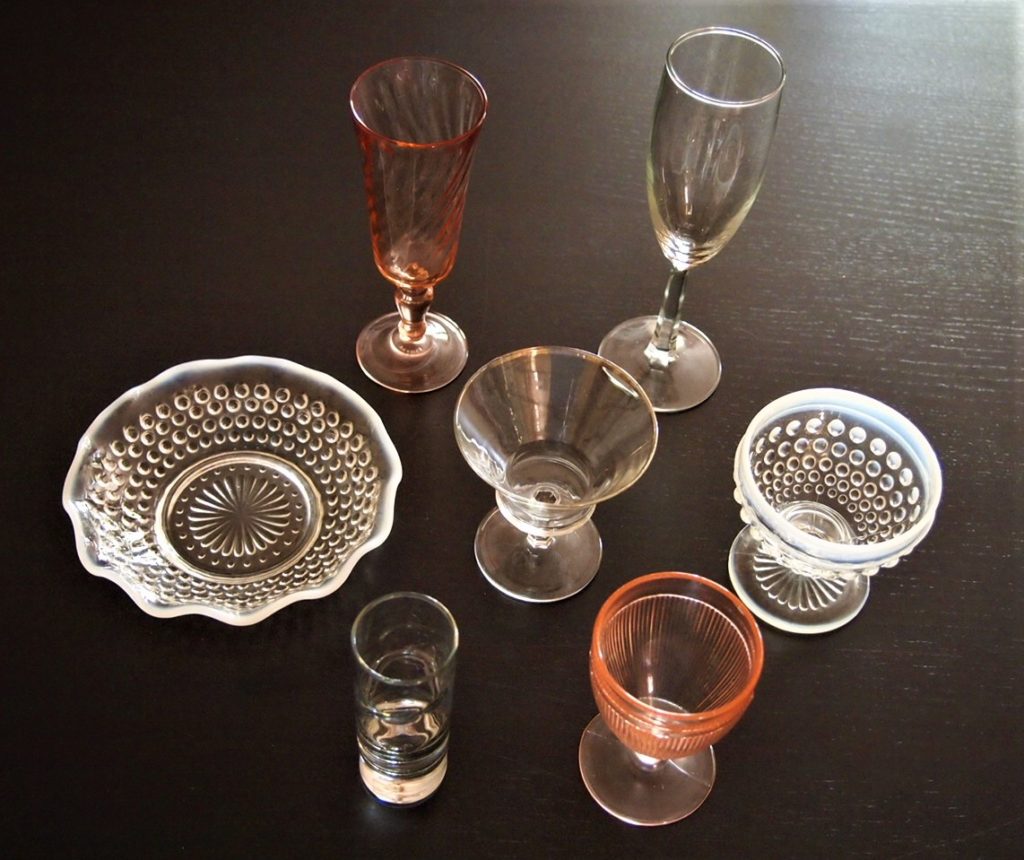
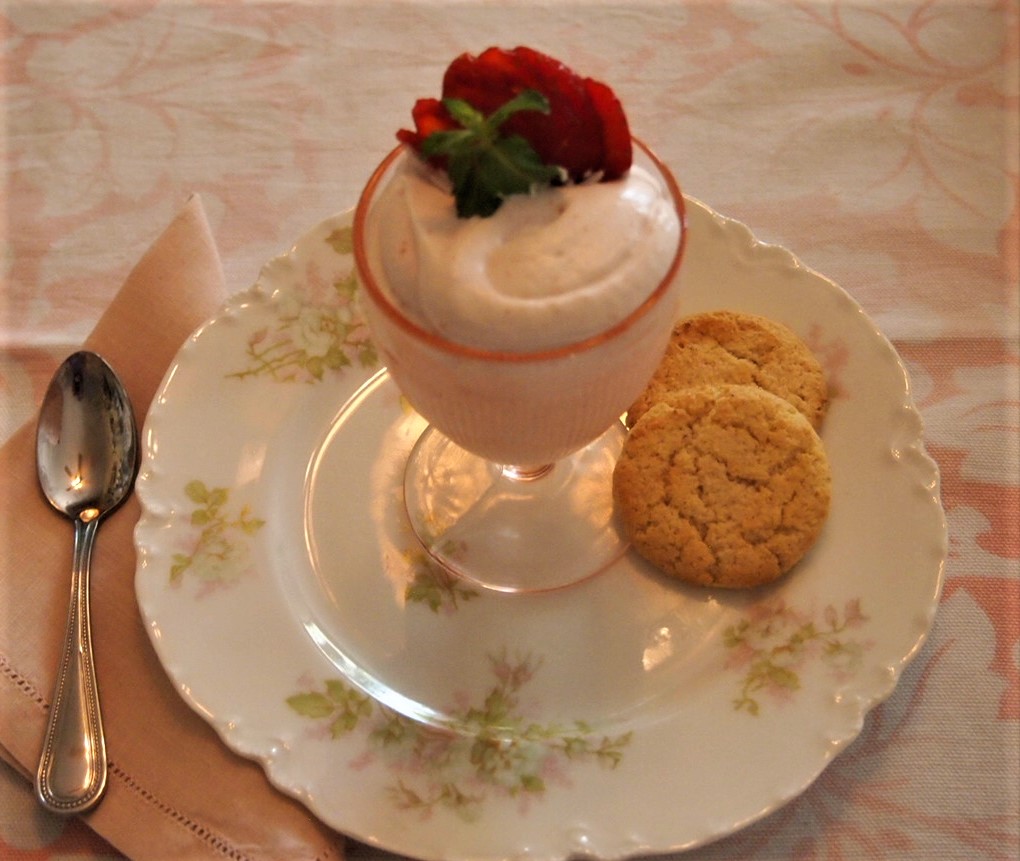
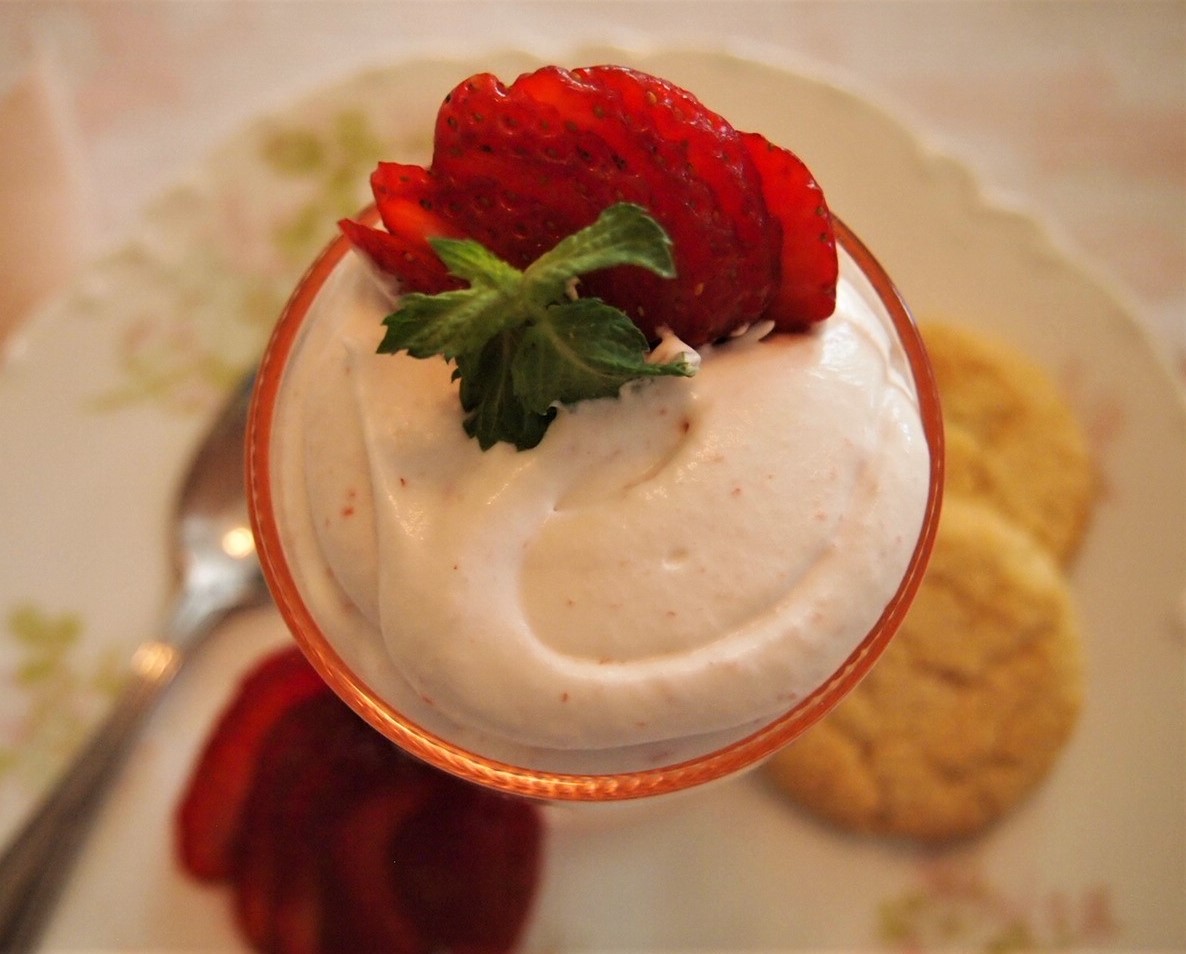
Pipe the Strawberry Fool into your selected dishes. I have used several different types of glasses. You will want to use a clear glass container so that you and your guests can enjoy the beauty of your Strawberry Fool. Here’s a selection…from vintage to modern, champagne flutes, berry bowls, juice glass and even a shooter glass!
Beautiful options for serving your fool
Serving your Strawberry Fool
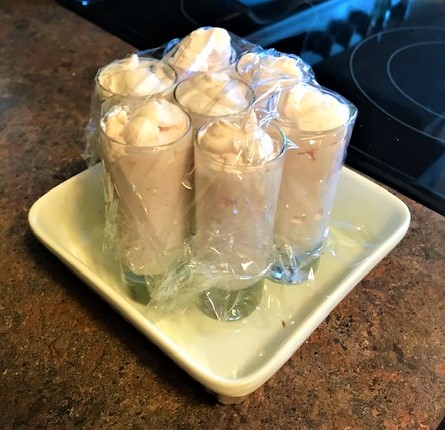
Once your dishes are filled, you will want to refrigerate your fool until serving. I have made these early in the day, store them in the refrigerator for teas or functions that I am serving later in the day. They will stay nice and fluffy until then. This is something that you will want to do the day of you are serving them.
Strawberry Fool in shooters, covered and ready for the refrigerator
Fruit Fool Variations on a Theme
Now that you have a basic recipe, step out and explore and experiment. Here are a couple ideas….Raspberries or Lemon Curd. Both delicious. The recipe changes a little bit to account for sweetness, but its pretty similar to the Strawberry Fool recipe and have been included below. You could do peaches, apricots, or blueberries – its all in your imagination. And the best privilege of the cook is that you get to taste it to make sure its delicious!
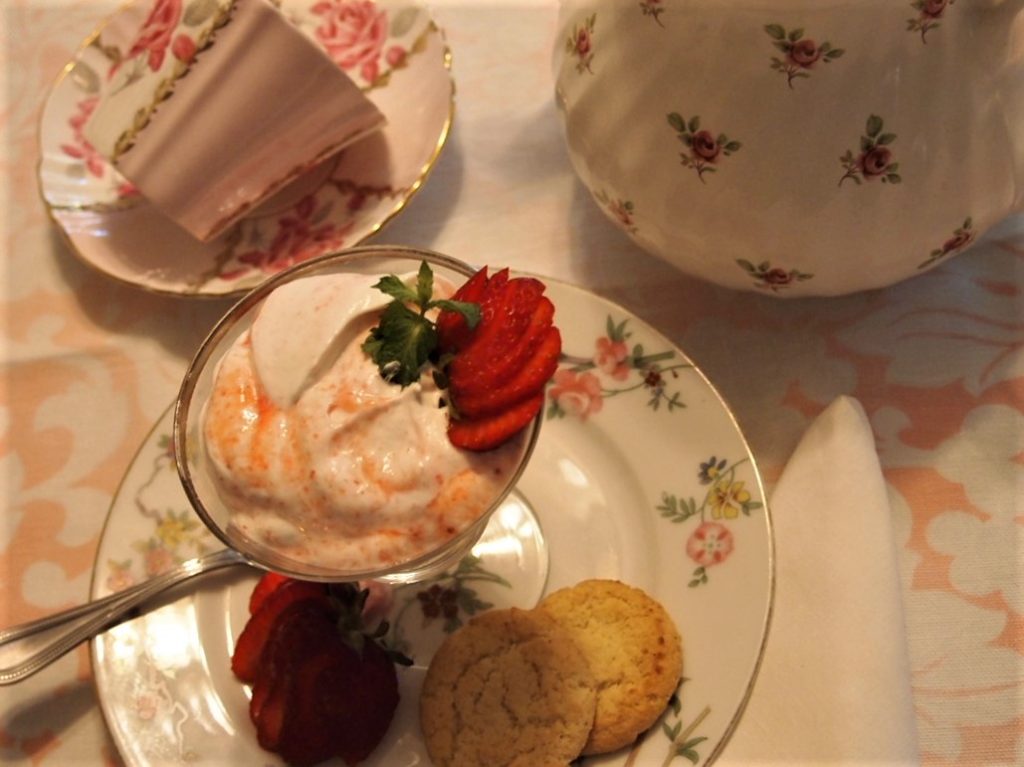
Variations on a theme – Strawberry Fool with Lemon Shortbread cookies and Lemon Curd Fool with other sweets during an afternoon tea dessert course.
So simple, so easy and yet very elegant and delicious. Enjoy a great Strawberry Fool – a fresh fruit dessert.
Ready for tea with friends….Fresh Strawberry Fool with berries and lemon shortbread cookies.
Add sugar and puree in food processor until smooth.
Press puree through sieve to remove seeds. Set aside.
Chill mixing bowl and whip.
Whip cream in chilled mixing bowl until stiff peaks.
Add vanilla.
Fold pureed strawberries into whipped cream mixture.
Pipe into serving bowls. Use a piping bag or gallon size Ziploc freezer bag (snip end of bag).
Store in refrigerator until serving. Top with a sliced strawberry and sprig on mint.
Notes
There are many variations for this recipe. Here are a couple to consider:1. For RASPBERRY Fool – use 2 cups of raspberries in place of the strawberries, 1/2 cup of sugar and 2 cups of whipping cream. Create the puree, strain as above. Whip the cream, fold in the berry puree. Pipe in serving bowls. Top with single raspberry.2. For LEMON Fool – use 1-2 cups of lemon curd in place of the strawberries. Omit the sugar and vanilla. Whip 2 cups of cream. Fold in the lemon curd. Pipe in serving bowls.NOTE: You can completely combine the puree and cream or you can leave streaks of the fruit puree in the cream. Either way, this provides an easy delicious dessert.
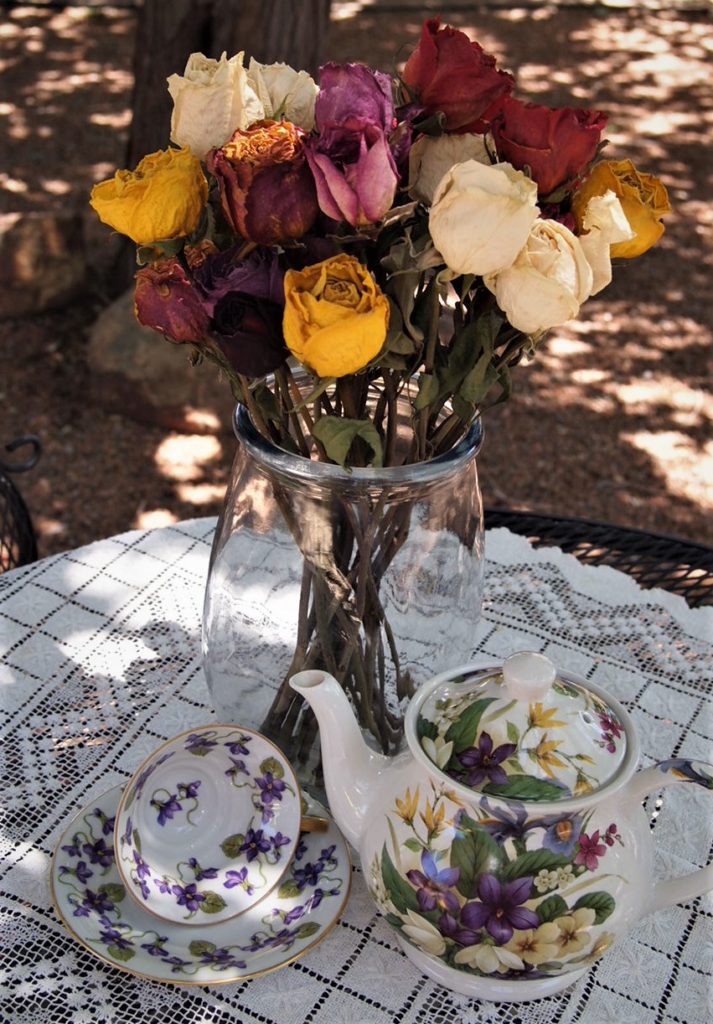
Most of us have received a dozen beautiful roses for some occasion. And as the days go by, they just seem to wilt and fade all too quickly. Here is a very easy way to dry roses so you can preserve those special memories.
You might recall that my son loves to gift me roses for Mother’s Day. The tradition continued this year with an extraordinary collection of beautiful roses. He has done this for years and in fact, I have the first dozen he gave me dried and in a vintage silver water pitcher.
Here is a tour of this gorgeous bouquet.
As the days went on, I knew this was one bouquet I was going to preserve. Here are the steps I use – you will be amazed how easy this is.
Prepare the roses.
You don’t want to wait too long to do this. The rose will begin to droop, you may begin to lose petals (which can also be dried) and you want the stems to still have integrity without any decomposition. Take off any excess leaves that you don’t want to be in the end bouquet and any petals that you think are too far gone. This particular grouping didn’t have any excess leaves or petals – so I had little prep to do.
Select a drying rack.
I like to use my laundry rack. It provides several layers and a large space to dry the roses. I have also used hangers but the rack gives you plenty of room.
Fresh flowers on drying rack
The drying process
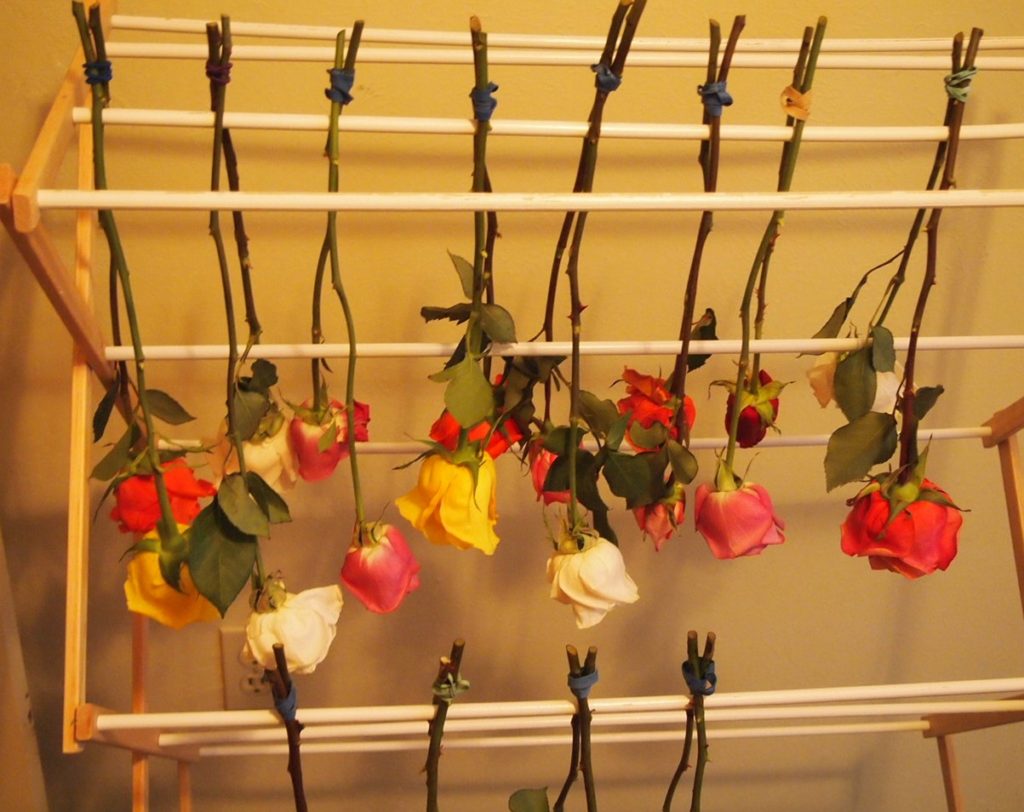
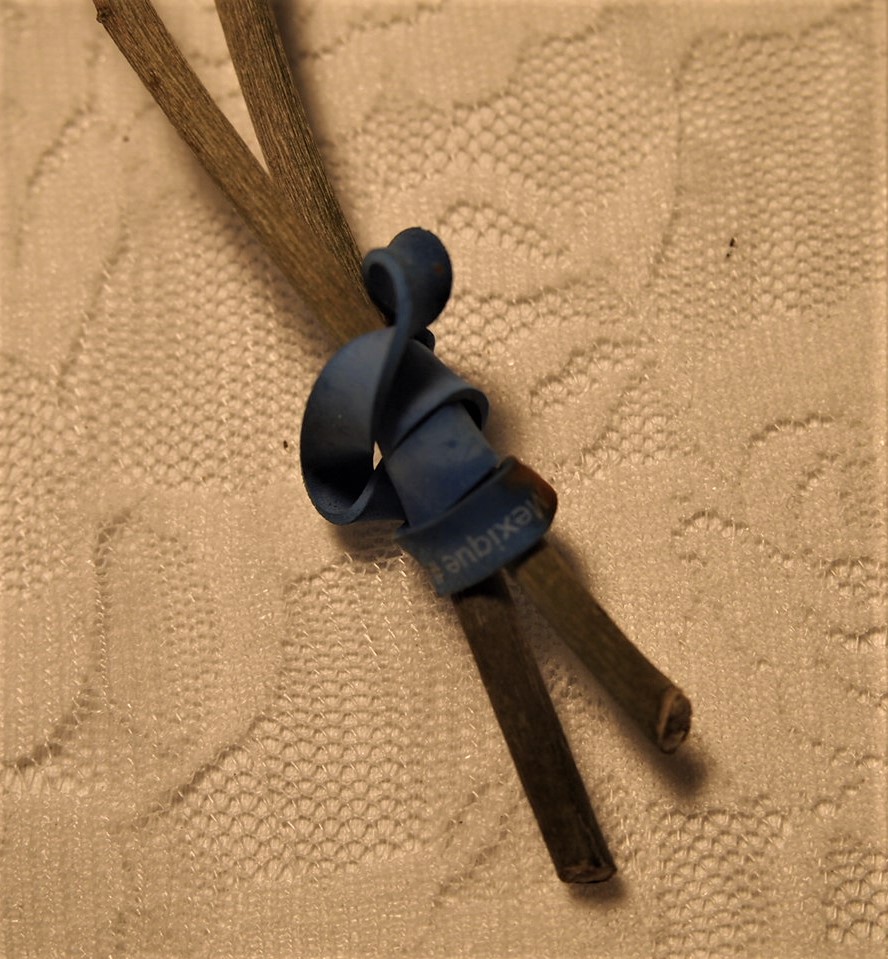
Using a rubber band, secure two roses together. Hang over one of the rungs of the drying rack. If the rose is drooping, gently straighten the bloom into that straight line. I put a towel underneath to catch any leaves that might fall during the drying process.
Flowers bound together with rubber band
And let your climate do the rest. The length of time to dry will depend on your climate. I live in an arid climate and so roses dry out quickly but generally you are looking at 1-2 weeks. When dried, the flower should be able to stand up and feel dry to touch.
Dried flowers on rack
Dried flowers
Sealing your dried roses
To further seal and preserve your roses, spray with non-perfumed hair spray or I like to use a matt finish clear spray. You don’t need to drench the complete stem, but spray all sides of the flower. This will dry quickly and then you are ready to enjoy.
Dried flowers ready to be sprayed
The results
Here’s the results. On the left is the live bouquet and the right is the dried. These roses dried beautifully and though they don’t have the same vibrant colors as the live roses, the dried version have a great array of colors to enjoy. I was very pleased with how these turned out.
Fresh bouquet
Dried bouquet
Other drying and preserving methods
This is one of many ways that you can preserve your flowers and for me, this works particularly well for roses. Here are a few of the other ways you can preserve flowers. You choice of method will depend on the flower that you are wanting to dry.
Air Drying Method
We just reviewed the air drying method. Hanging bouquets upside down is the most traditional technique for drying flowers.
Another variation is to allow your bouquet to dry in the vase. Leave a little water in the base of the vase and then just allow the bouquet to dry. This method works best for baby’s breath, lavender or hydrangeas.
Dried roses off rack
Silica Gel
If you want your flowers to look just like they did in your garden, try using silica gel. The sandy-like substance can be found at craft stores and works best with sturdy flowers like zinnias or roses. Bury your blooms in a large container of silica gel. In a few days to a week, gently uncover vibrant, preserved flowers. Don’t over dry them – they will become brittle.
Pressed Method
Many of us will remember doing this in grade school. While this method can be time-consuming, there’s little effort involved and the results are consistently wonderful. Take a heavy book, line a page with parchment or wax paper and arrange flowers face down so they don’t overlap. Close the book and leave untouched for seven to ten days. Once all the moisture is gone and they have a papery texture. This works great for flowers that will flatten well – daisies or violets are great suggestions.
Microwave
Take the flower you want to dry and place between two coffee filters. Then place on a plate and top with another plate. Microwave for 1 minute. Repeat until you achieve your desired result.
Whatever method you use, preserving your special flowers allows you to reflect on the beautiful memories of that time. Now ready to reflect and enjoy with a nice cup of tea.
“Dried roses are proof of the memories which are still wet in my eyes”
You know how the saying goes, right? So many quick breads….so little time. And who doesn’t love a warm slice of a fresh made quick bread? That’s a rhetorical question you know. We all would! But what exactly makes a quick bread so special? Its not just in the fact that they go together easily, but their variety is without boundaries. First, let’s look back on how the quick bread all got started.
A Quick History of the Quick Bread
“Quick bread” most probably originated in the United States at the end of the eighteenth century. Before the creation of quick bread, baked goods were leavened either with yeast or by mixing dough with eggs.[2] “Fast bread” is an alternate name.[3]
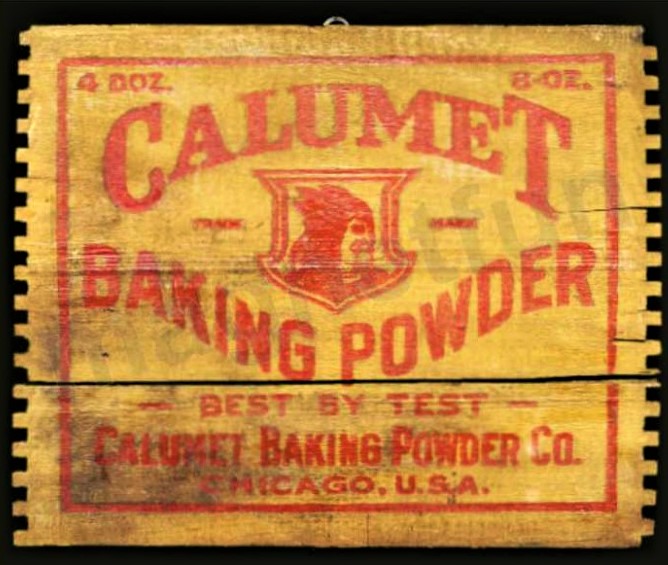
Early Calumet Baking Powder crate
The discovery or rediscovery of chemical leavening agents and their widespread military, commercial, and home use in the United States dates back to 1846 with the introduction of commercial baking soda. in New York, by Church and Dwight of “Arm & Hammer” fame. This development was extended in 1856 by the introduction of commercial baking powder in Massachusetts, although perhaps the best known form of baking powder is “Calumet“, first introduced in Hammond, Indiana and West Hammond, Illinois (later Calumet City, Illinois) in 1889. Both forms of food-grade chemical leaveners are still being produced under their original names, although not within the same corporate structure.
During the American Civil War (1861–1865), the demand for portable and quickly-made food was high, while skilled labor for traditional breadmaking was scarce. This encouraged the adoption of bread which was rapidly made and leavened with baking soda, instead of yeast.[4]
Common Elements of Quick Breads
Quick breads are flour mixtures. They include many different kinds of breads which differ greatly in flavor, size and shape, and general appearance. All of them can be made quickly and served deliciously warm. They are made with a variety of fast-acting leavening agents – baking soda, baking powder and paired with salt for flavor. The Quick Bread rises with a combination with air, steam and CO2 in the fast acting leavening agent.
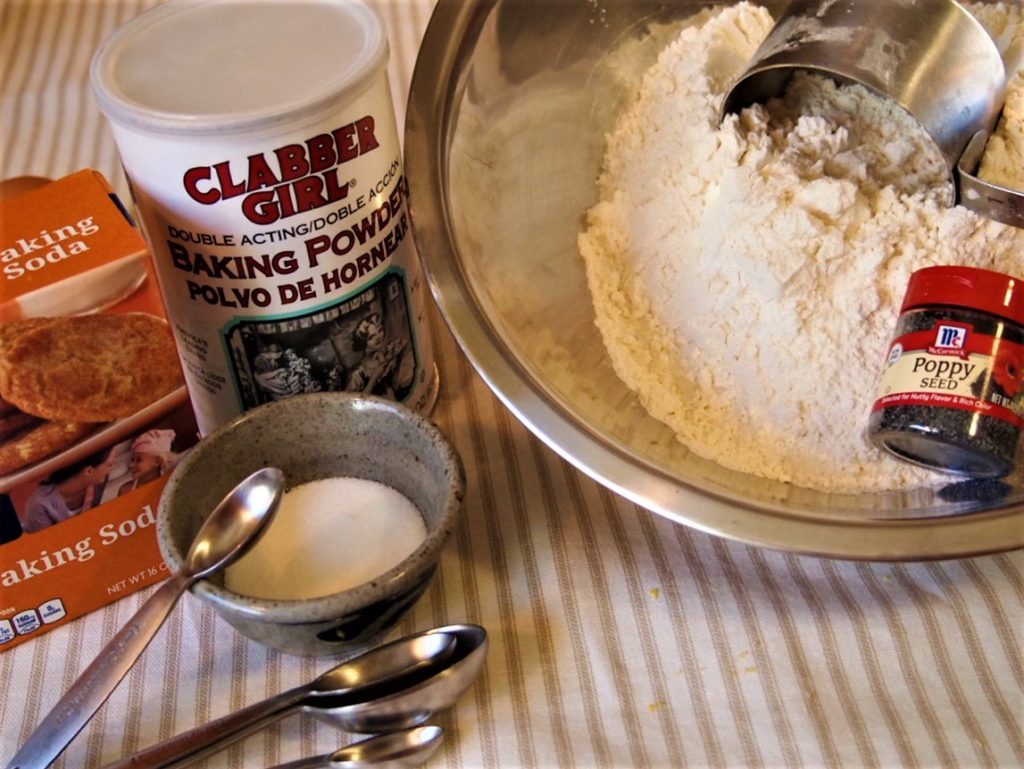
Baking powder, baking soda, and salt
All quick breads contain most of these basic ingredients:
Flour- Structure
Leavening agents-rise and become light and porous
Salt- Flavor
Fat- Tenderness
Liquid- Activates the leavening agents and dissolves ingredients 6. Egg-Color, flavor and nutrients
Sugar-Sweetness and browning
Type of Quick Breads
Pour batters: thin in consistency, these can be “poured” from the mixing bowl. They may contain equal amounts or close to equal amounts of liquid to flour ratio. Ex) waffles, pancakes, popovers.
Drop batters: are fairly thick and need to be scraped from the bowl into the baking pan. They usually contain twice as much flour as liquid. Ex) Muffins, biscuits, quick loaf breads and coffee cakes.
Soft dough: is thick enough to roll and shape by hand. It contains about three times as much flour as liquid. Ex) biscuits, doughnuts, scones and some coffee cakes.
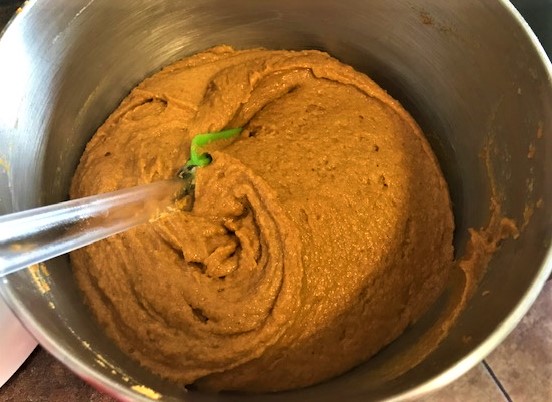
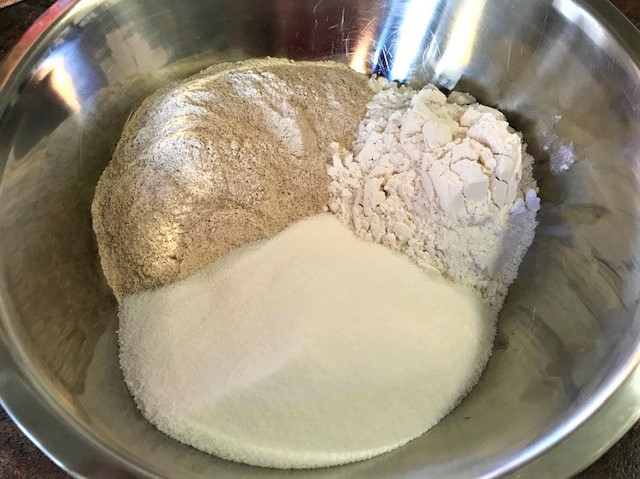
Whole Wheat Pumpkin batter ready for the pan
For the purpose of this post, I will be focusing on Drop Batters. But don’t worry – I have plenty of recipes for Pour and Soft Quick Breads. And Quick Breads are not always sweet. There are many amazing savory quick breads – so look forward to some of those in the future. Here are some delicious examples: Irish Soda Bread, Cheesy Beer Bread, and Rosemary Quick Bread.
Methods For Mixing Quick Breads
MUFFIN METHOD: Used for muffins, waffles, griddle cakes, popovers and fruit and nut breads. Mix dry ingredients (sometimes sift) in a bowl and make a well. Combine the liquid (separately). Pour liquids into the well of dry ingredients. Mix to combine ingredients until just moistened. Scrap from bowl into pan. Bake until golden brown with rounded top, slight cracking on top and no tunnels.
BISCUIT METHOD: Sift together dry ingredients. Cut fat into the flour mixture using a pastry blender. Add liquid all at once and combine. Turn dough out and knead. Roll dough flat. Use a floured biscuit cutter to cut biscuits. Bake on an ungreased cookie sheets until golden brown with a flat top and symmetrical.
CONVENTIONAL METHOD: Cream together fat and sugars. Add eggs. Alternate addition of dry and liquid ingredients.
The Do’s and Don’ts of Quick Breads
Though quick breads are easy to put together and taste delicious, there are some tips and tricks to avoid the not-so-optimal quick bread. I am no expert by any means, but here are a few of my tidbits of knowledge from my successes and failures! Hope they are helpful.
My quick bread is sticking
Size and type of pan is critical. I like to use a standard 9 x 5 treated metal pan like Calphelon. Hand wash my pans – never in the dishwasher. Depending on the recipe, I might use a smaller pan.
Filling the pan. Only fill the pan to 2/3 of the depth of the pan. This will ensure for proper rising and even baking.
Prepping the pan is important. I always use a cooking spray on my pans and then line the bottom with parchment paper.
Cooling time is essential. My breads cool in the pan for 15 – 20 minutes. Then I run a knife around the edge and turn them out onto the cooling rack to finish. Bundt pans should cool twice the time as your loaf pan.
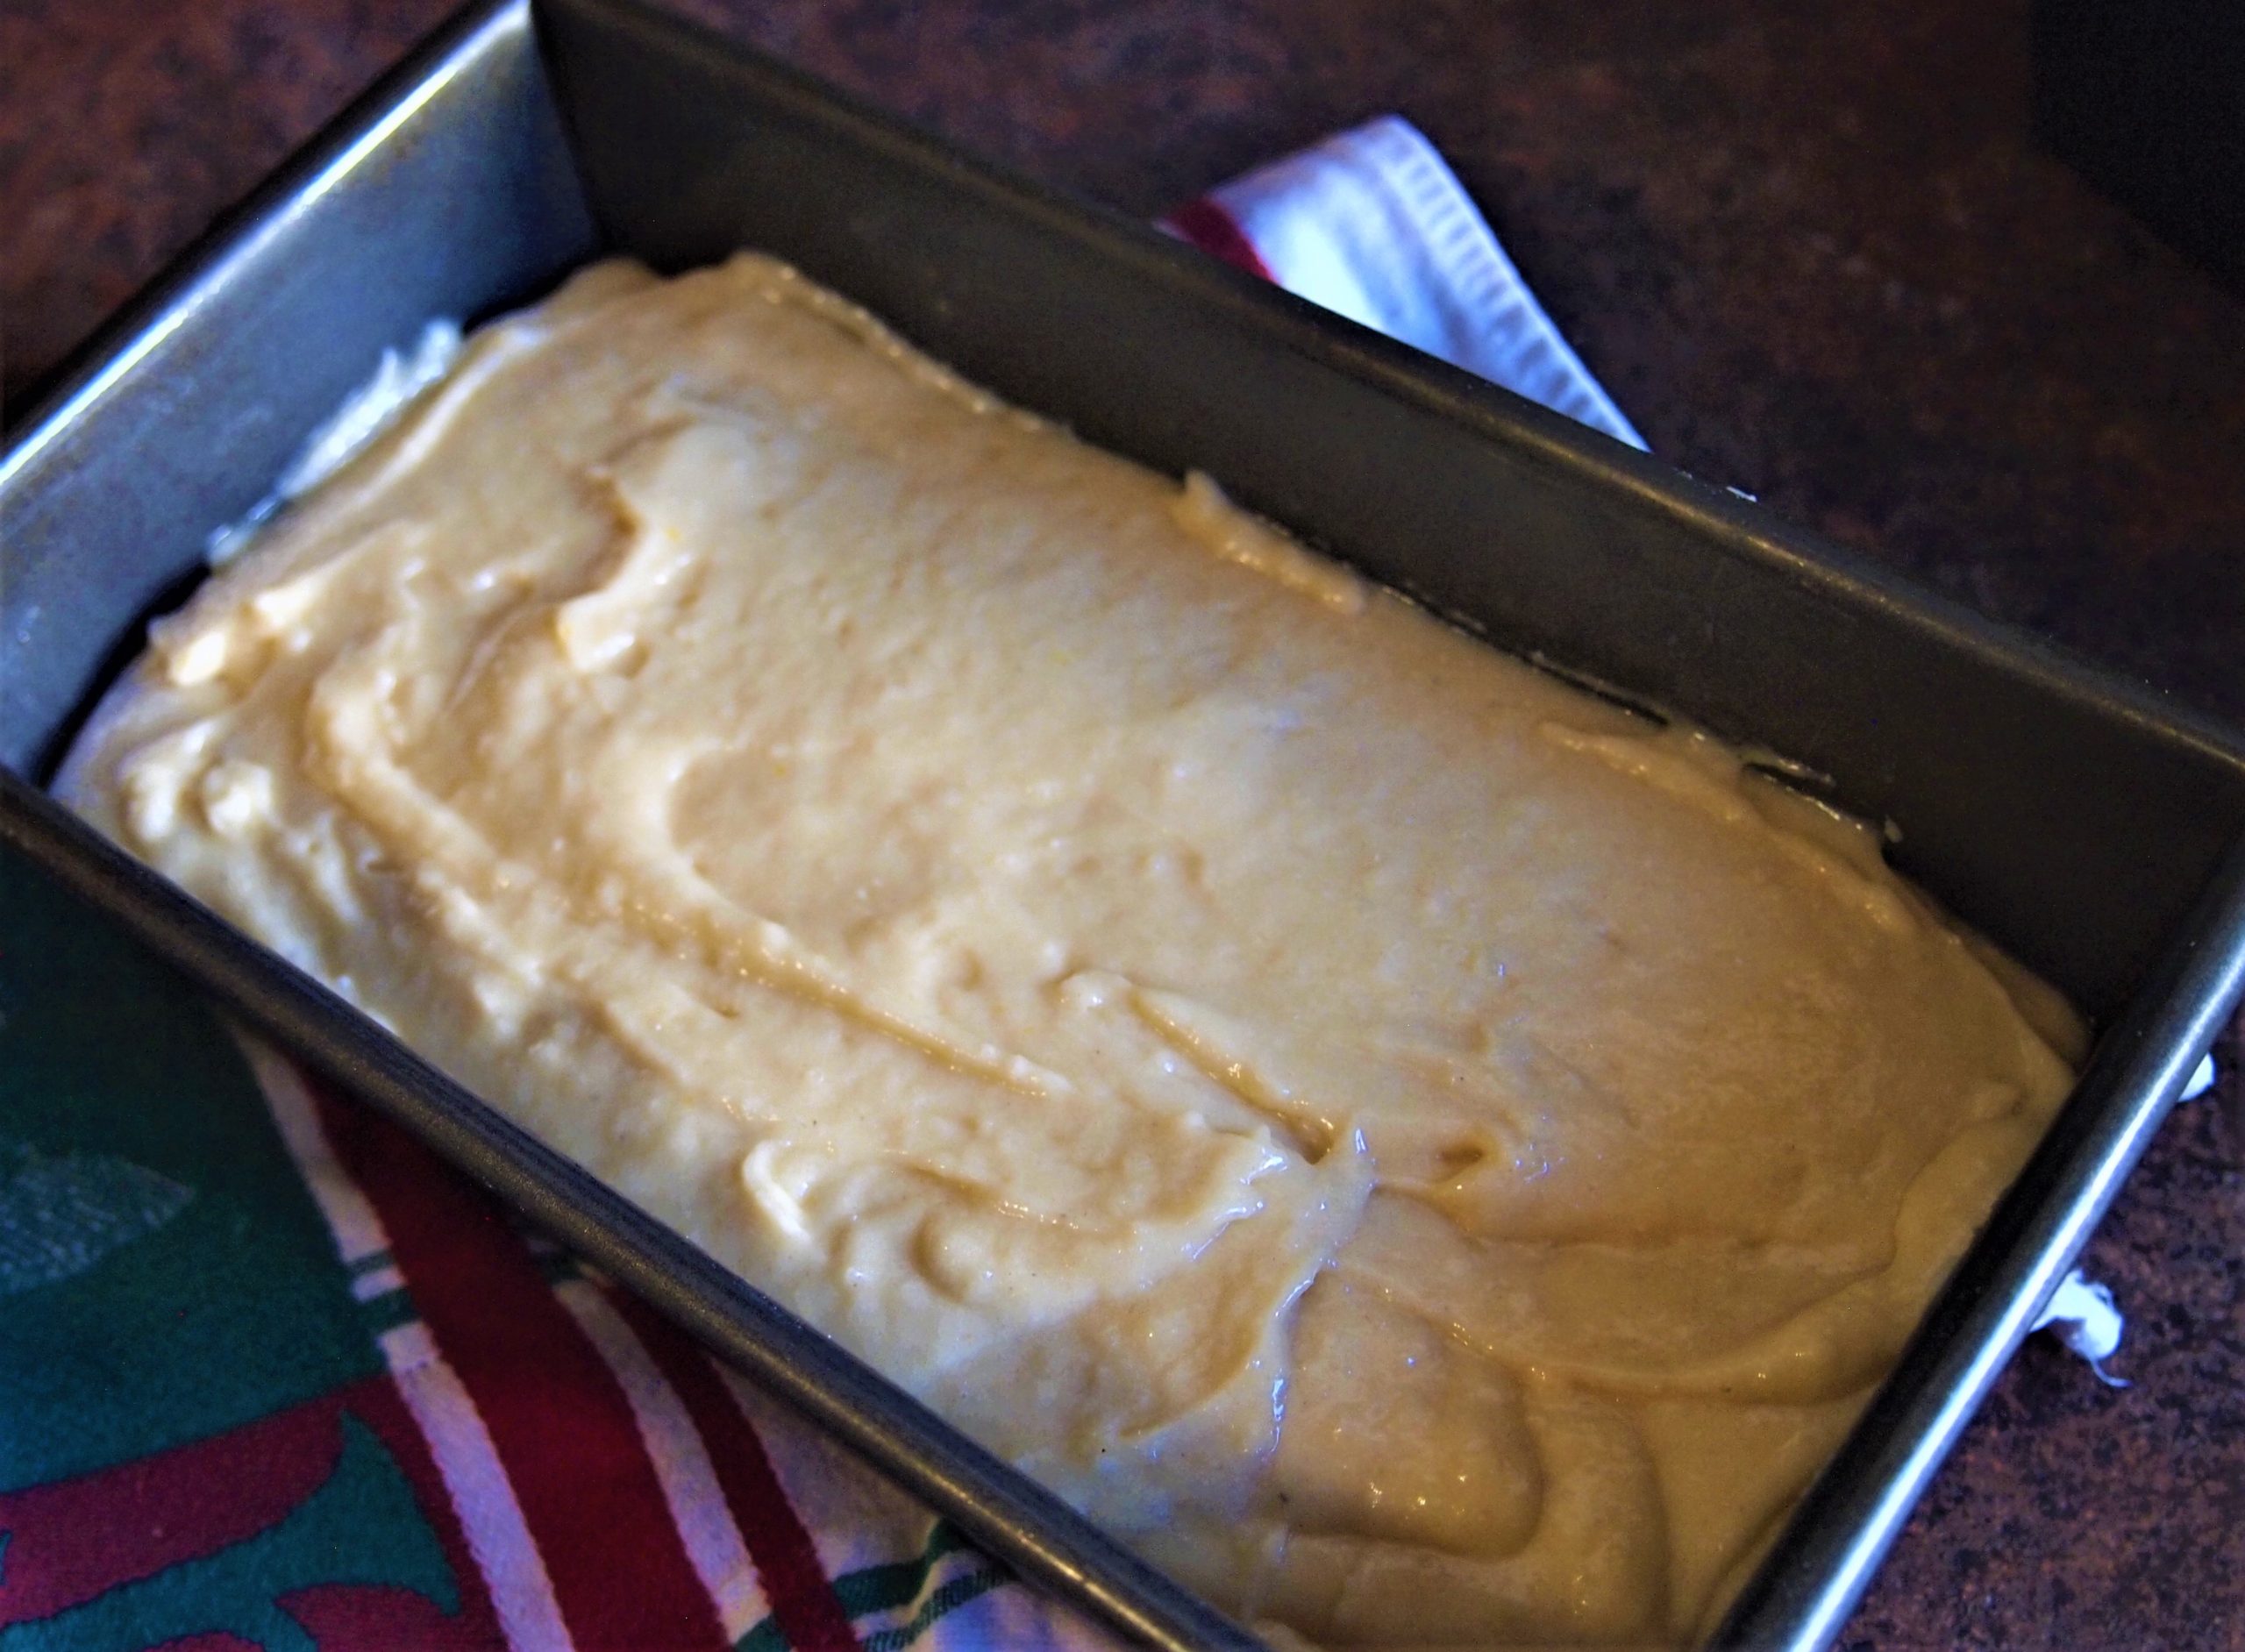
Eggnog quick bread batter
Mixing by Hand or Mixer?
For me, this depends on the recipe. I frequently use my mixer but do have some recipes that just work better when mixed by hand with ingredients folded in. Don’t over mix!
Dry ingredients separate from liquid ingredients. For the most part, I prepare my dry ingredients in one bowl, to either add to the liquid mixture either by hand or in the mixer.
My berries sink to the bottom!
Dust your berries in a little flour before you fold them into your batter. This will help prevent them from sinking to the bottom. I do this at the end of my mixing right before I pour into the pan. If using frozen berries, don’t thaw – just dust the frozen ones and fold in at the end as above.
Big holes / Tunnels / Tough Bread
Likely overmixed the batter. Don’t let the batter sit around before you bake as well.
The middle has sunk in and the bread is soggy
Too much liquid in the batter, insufficient leavening, the batter stood too long before baking, or it’s underdone.
Crack down the middle
This is normal and nothing to worry about. And honestly, I love seeing a very rounded loaf with a nice crack down the middle.
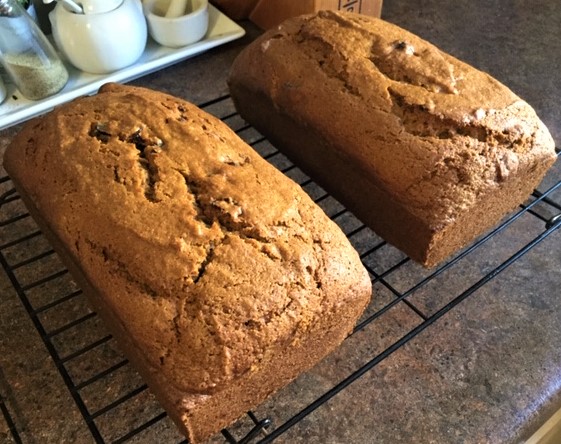
Whole Wheat Pumpkin loaves cooling
Bread done on the outside and not in the middle
Generally, lower your oven temperature. Also consider, if you have too much batter in the pan – a larger pan might spread the bread out and make it able to consistently bake through.
My bread is dry
Again, check your oven temp. Your bread will continue to bake a little when out of the oven, so get used to testing and feeling your testing tool for moistness. I like to wrap my breads when they are warm to help prevent drying out.
Favorite Quick Bread Recipes
Here is a collection of some of my favorites. Check out the recipes and give them a try – I know you will enjoy them!
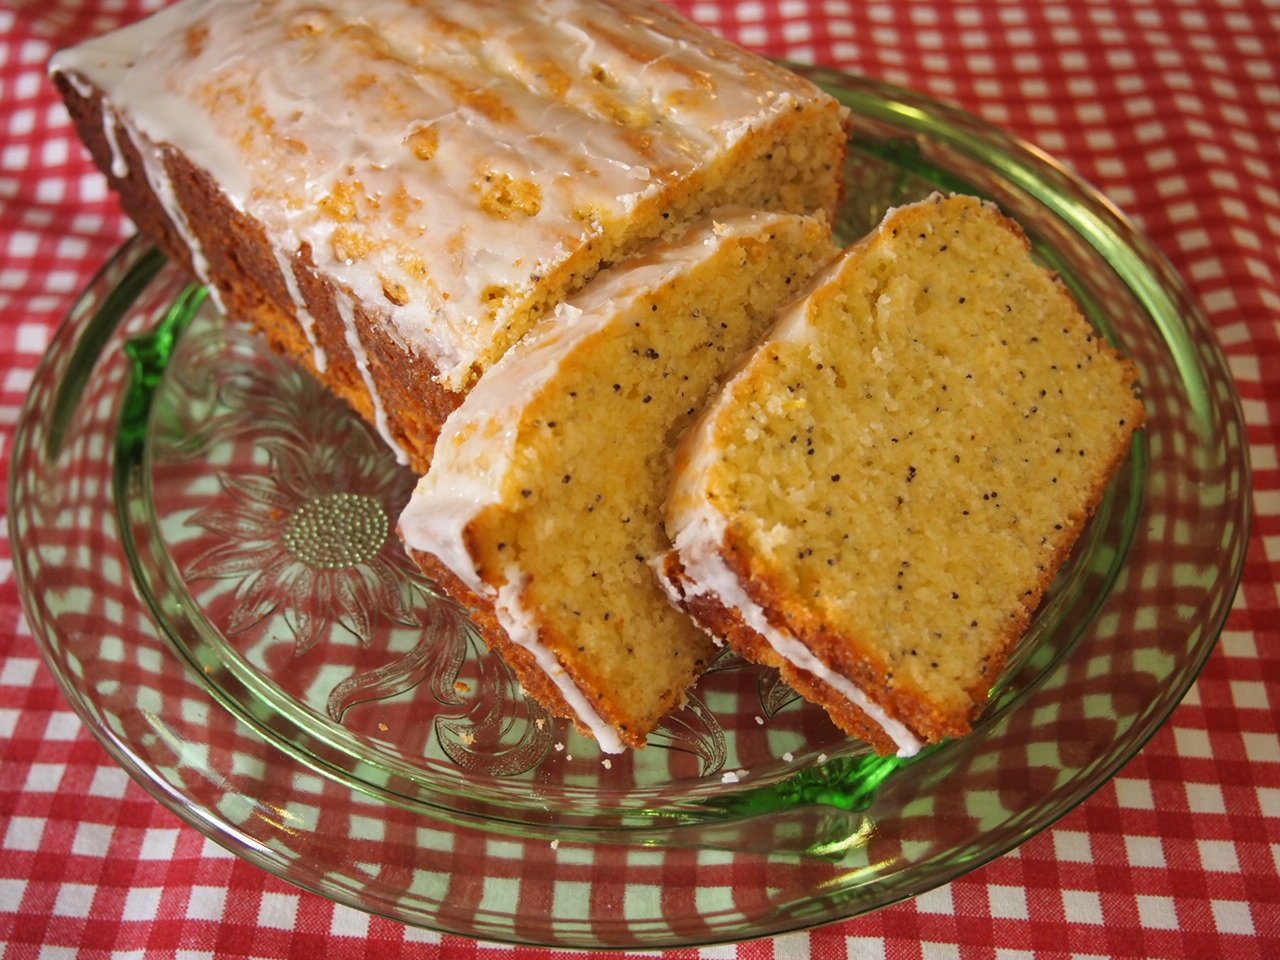
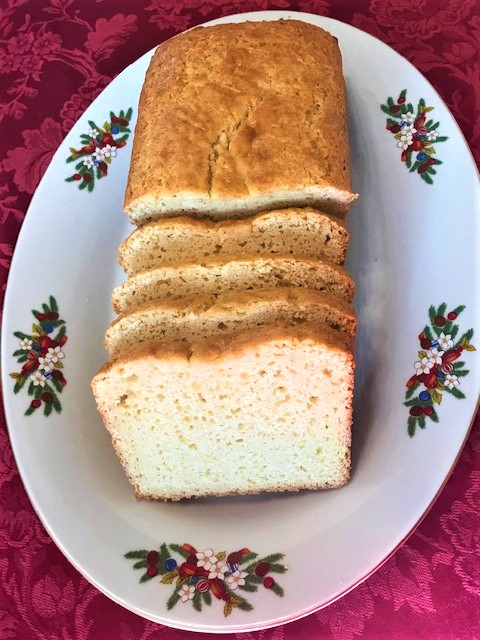
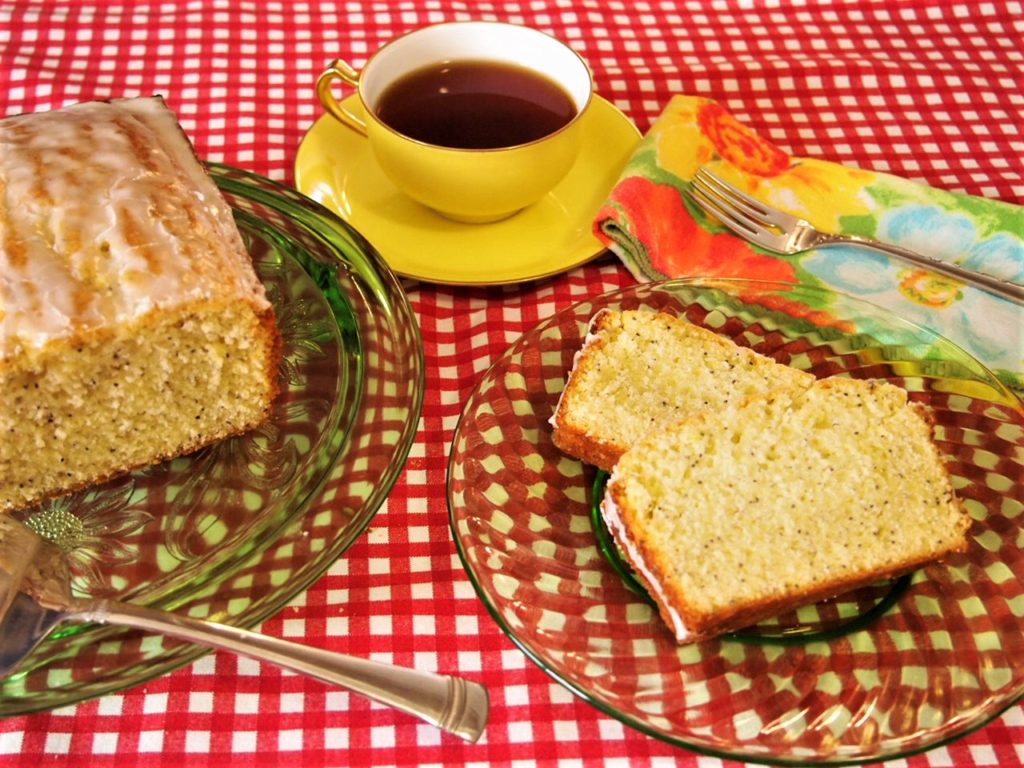
Lemon Poppy Seed Bread
This is a sweet yet slightly tart quick bread with a lemon glaze. Perfect for afternoon tea or a slice on your own.
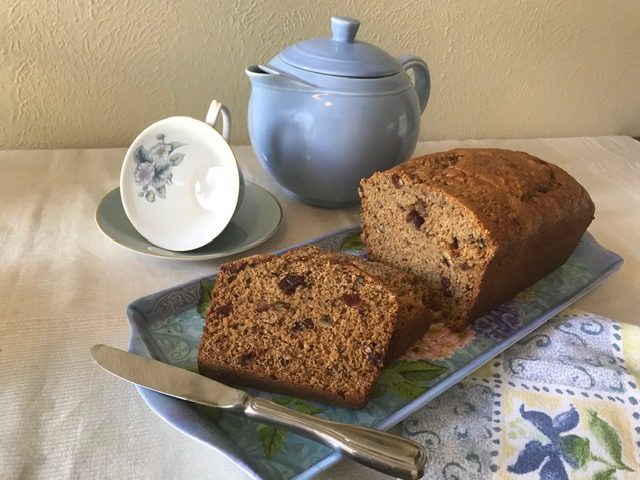
This quick bread is a mix of spices, cranberries and applesauce in this moist quick bread made with a combination of all purpose flour and whole wheat flour. A light yet hearty bread good for any season.
A quick and easy quick bread with the seasonal flavors mixed with a blend of wheat and white flours. Generally for fall but good for any season. Yields 2 loaves of a moist and delicious bread.
Give me a spring garden party, a cup of tea and delicious slice of Lemon Poppy Seed Bread and the season comes alive. Another treat in the long line of my favorite quick breads, this quick and easy Lemon Poppy Seed Bread is a sweet and tart slice of spring. Let’s make this bread.
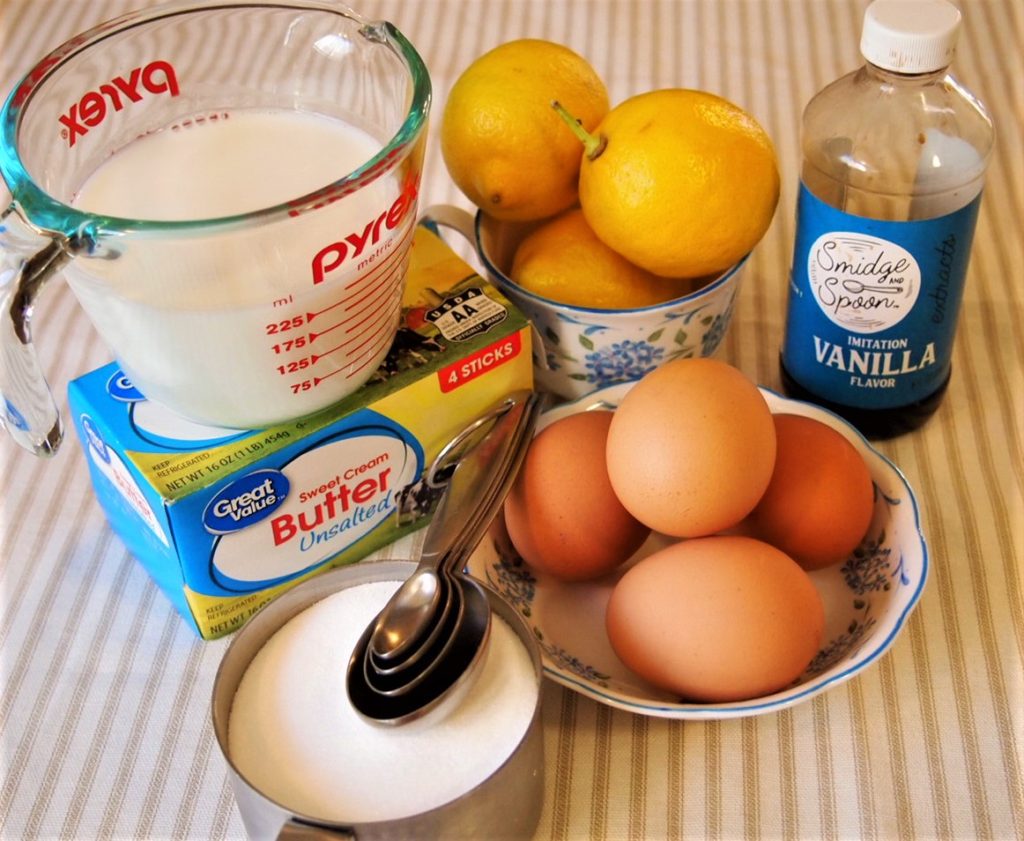
Ingredients
All-purpose flour
Poppy Seed
Baking Powder
Baking Soda
Pinch of salt
Unsalted butter
Sugar
Eggs
Vanilla
Zest from two lemons
Lemon juice
Buttermilk
Powdered Sugar
Preparing the dry ingredients
In a bowl, add the flour, baking powder, poppy seeds, baking soda and pinch of salt. Using a fork, combine. Set aside.
Dry Ingredients
Preparing the Liquid Ingredients
In a mixing bowl, beat the butter and sugar together until fluffy. Then add the eggs and vanilla, beat well.
Liquid Ingredients
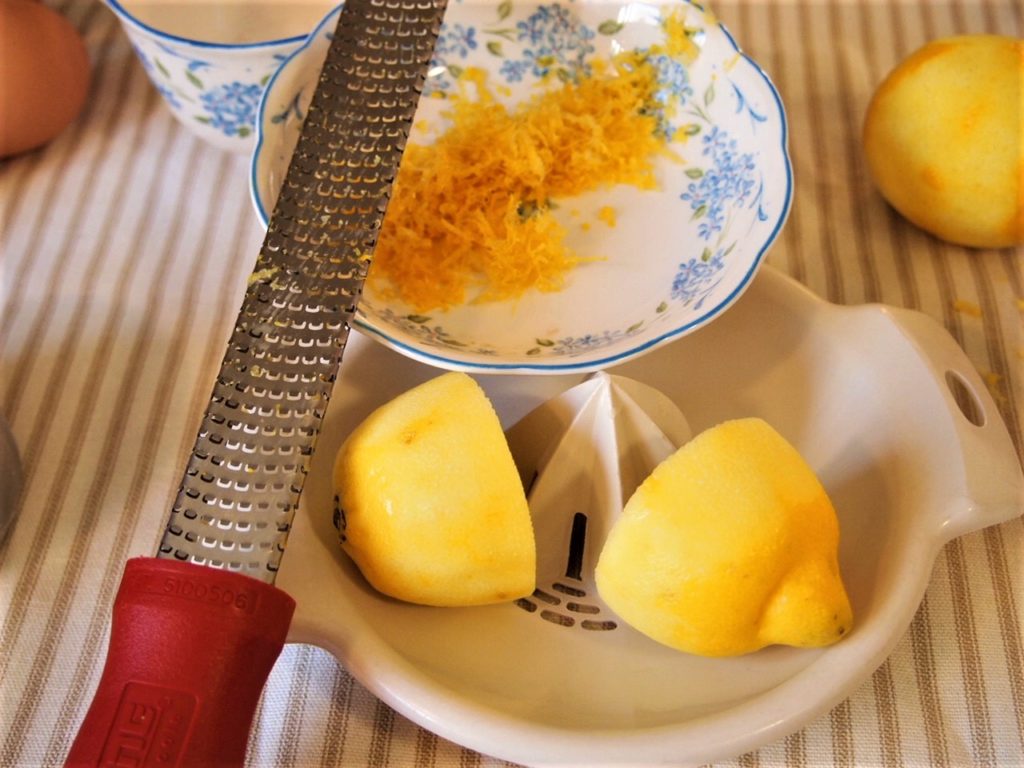
Prepare the lemons for the liquid ingredients. Zest two lemons and juice one of them. Add to the liquid mixture and mix well. You will use the juice of the second lemon for the glaze.
Zesting and Juicing Lemons
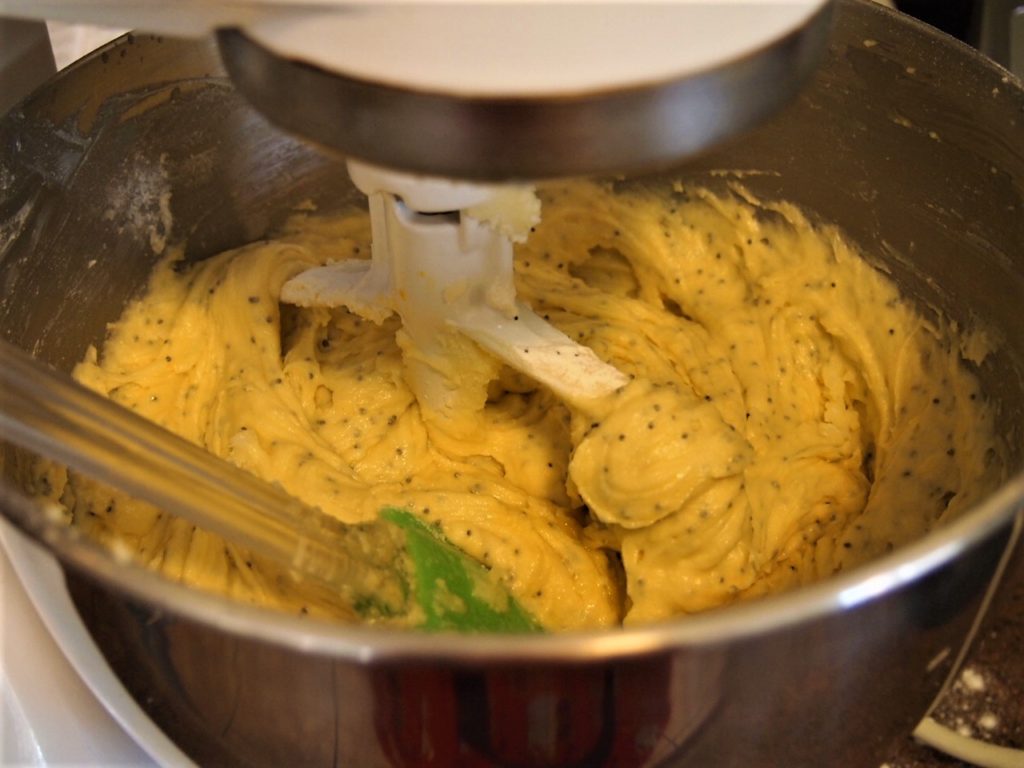
Add the dry ingredients to the liquid ingredients. Mix well.
Lemon Poppy Seed Batter
Baking the Bread
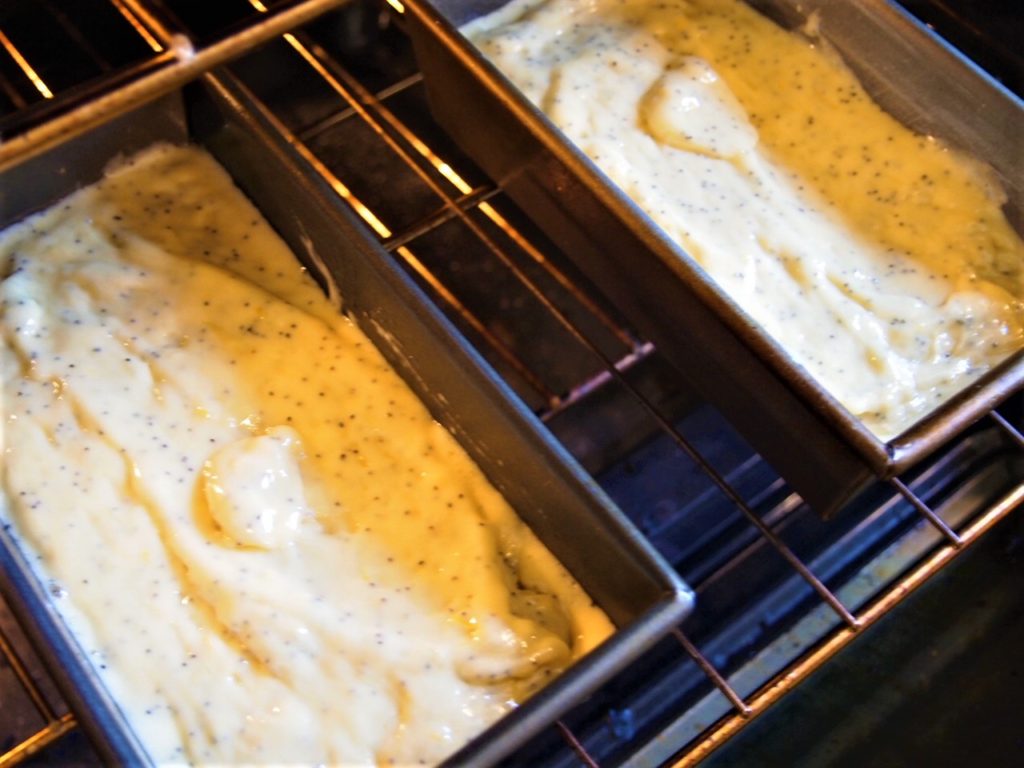
Preheat the oven to 325 degrees and prepare 2 9×5 loaf pans with baking spray and lining the bottom with parchment paper. Pour the batter into the pans and place in the over for 45-55 minutes or until a tester comes out clean. Don’t over bake these bread – they will come out dry.
Batter in Loaf Pans
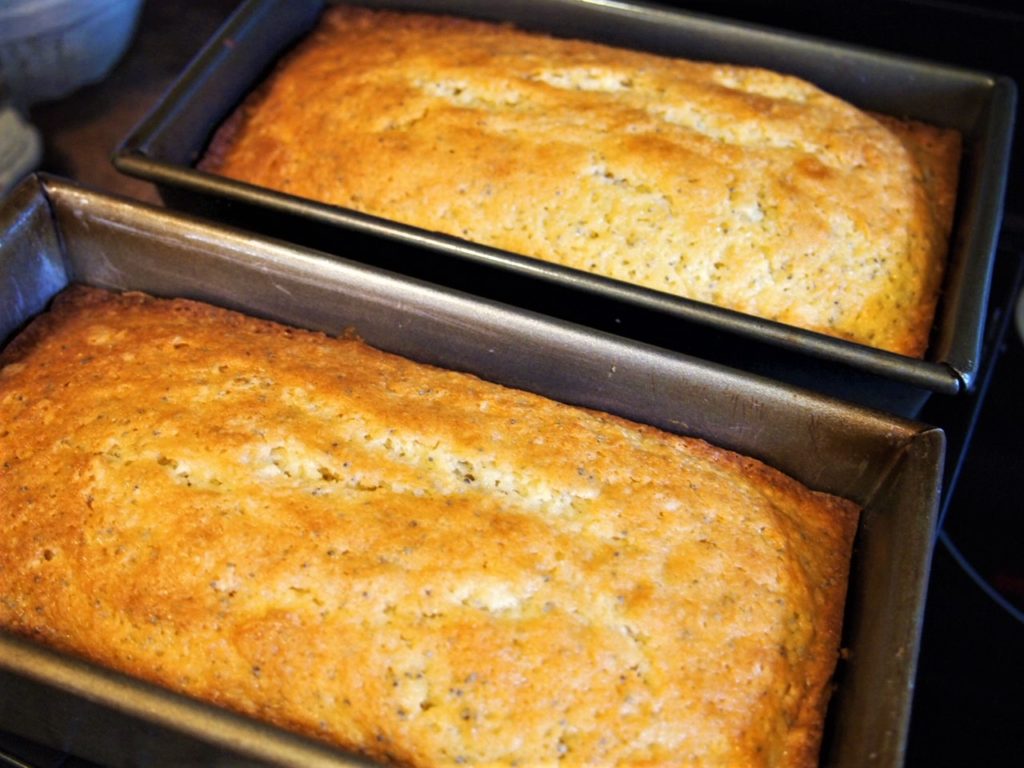
Freshly Baked Breads
Allow the breads to cool for 15 minutes. Remove from pans and allow to completely cool on baking racks.
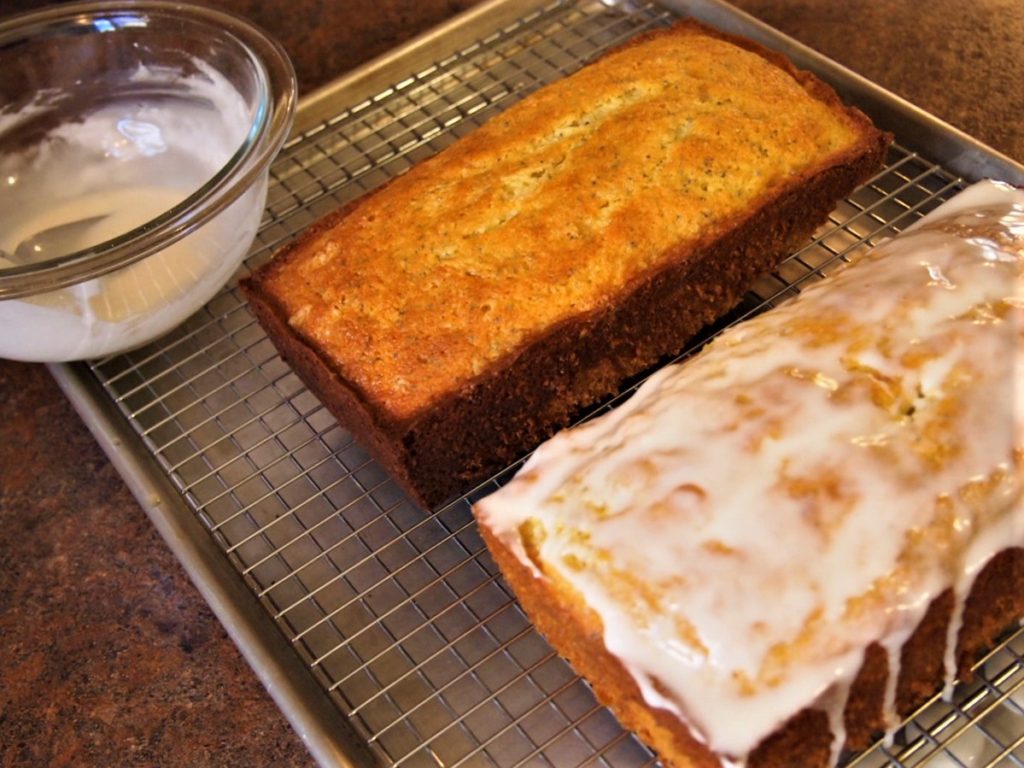
Glazing the Loaves
For the glaze, which is the best part, take the powdered sugar and lemon juice from the second lemon and mix together until smooth. Take the completely cooled bread and pour over the top.
Preheat ovent to 325°. Prepare 2 9×5 loaf pans with cooking spray, lining bottom of pan with parchment.
In a separate bowl, place flour, poppy seed, baking soda, baking powder, and pinch of salt. Set aside.
Using electric mixer, beat butter and sugar together until fluffy.
Add eggs and vanilla and beat well.
Add buttermilk, zest of 2 lemons, juice of one lemon and combine.
Combine dry ingredients with liquid. Combine until fully incorporated.
Pour batter into prepared pans.
Bake for 45 – 55 minutes until tester comes out clean. Remove from oven and let cool for 15 minutes before removing breads from pans. Let continue to cool on wire rack.
Glaze
Combine 1 cup powdered sugar and the juice from the second lemon. Whisk until smooth. Pour over breads.
Spring brings rebirth to our seasons. It comes as a fresh start after the sometimes long winter. We look forward to it and it begins a season of growth and planting. In this challenging season, I am excited to share with you some new tea tasting with spring blooms.
Before we get started, a couple stories and accolades. First, about the pictures. These pictures are from those early spring strolls that we are all taking these days. The first blooms of spring were captured by three beautiful women – Brenda, Marissa, and my daughter. Thank you for these demonstrations of God’s consistent character and presence in spring.
Secondly, about the teas. I have wanted to get out and sample some new teas. With all of us being at home these days, I have not been able to to this. To my surprise, one day a package arrived at my home. Inside was a sweet note of thanks from my daughter-in-law’s mother, thanking me for taking care of her daughter during a recent illness. What an unnecessary surprise and treat. But inside the box was the best – a selection of teas that I had not had before. I was delighted and blessed. These teas set the basis for this session of tastings.
Many thanks to all these contributions to this latest adventure.
Tea and Treats Gift Box
Using the colors of the flowers, I have taken these first blooms and have coupled them with some of my teacups. Along with this, I have paired a new tea for your tasting enjoyment. Let’s take some time to deep breathe and enjoy the walk through God’s beautiful creations. Come along with me for a virtual spring stroll.
Tea Tasting Guidelines
A reminder of the process. Let’s use the tea tasting guidelines that were posted some time ago. Here’s a refresher.
Assemble and setup brewing station and table
Place a small amount of the loose tea in a bowl or plate. Smell the tea and note flavors or scents of the raw tea.
Steep the tea according to the directions.
In a fresh cup, pour a portion of tea. Observe the color and the smell of the steeped tea.
First sip the tea with no additives.
Then begin with additives –
Sugar alone
Milk alone
Sugar and milk
Discuss impressions – likes, dislikes, possible pairings with food.
Repeat process for additional tastings, getting fresh cups and pot
Click here for a copy of your Tea Tasting Guidelines for the Daily Enthusiast
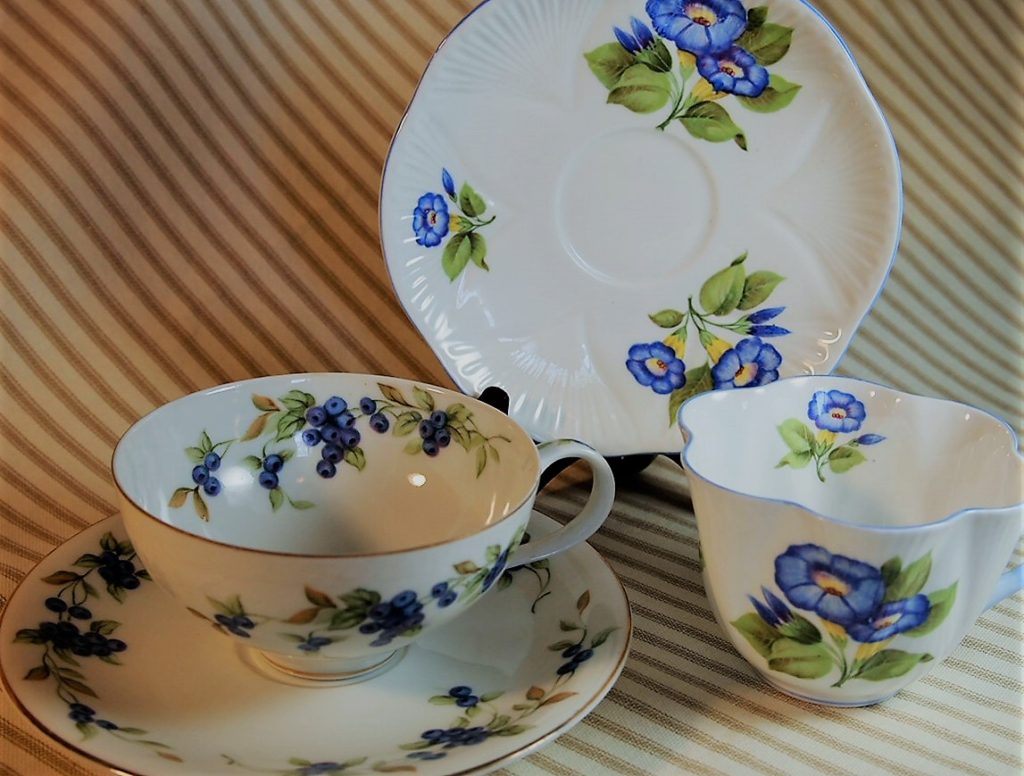
Our first selection is a reflection of blues. This is Blueberry Black Tea. This tea is from Yunnan China and is a mix of black tea and blueberries. You can see and smell the blueberries in the loose tea. When this tea is steeped, it takes on a very light hue of blue within the black tea. The first smell of the steeped tea is definitely blueberry, the taste as well but is subtle. With a little sugar added, the blueberry taste is definitely accentuated. With milk, I felt it dulled the flavor – and the color was a purple gray. I would enjoy this tea again, using a small amount of sugar to enhance the blueberry flavor. Steep this tea for 3-5 minutes.
Blue Setting with Blueberry Black Tea
The Blueberry Black Tea was served in Greystone teapot by Johnson Brothers and enjoyed in a teacup by Hidone – Blueberry made in Japan.
Spring Purple Blue Flowers
Teacups – Hidone Blueberry Japan / Morning Glory by Shelley
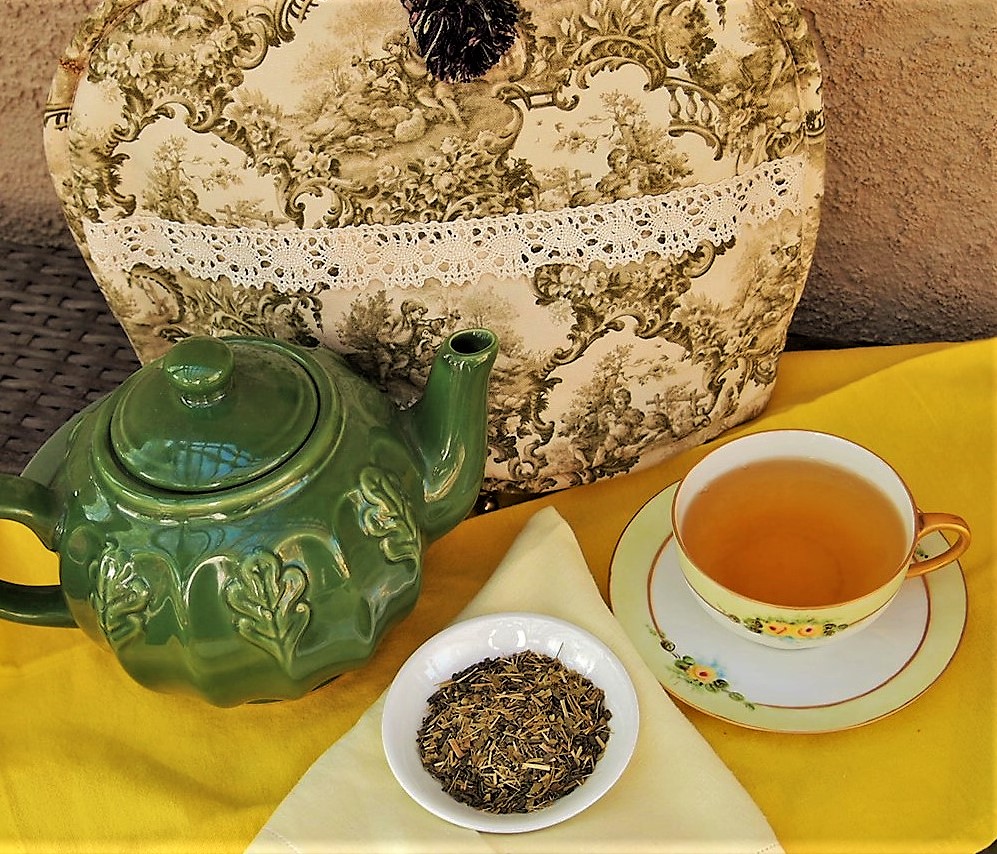
Lemon Drop Mate
This tasting was for Lemon Drop Mate, a white tea that has been infused with lemon and combined with Macha. The loose leaf tea has a gorgeous grassy look and a light citrus smell. The steeped tea has a delicate lemon taste with almost a mint-like flavor and has this beautiful light amber color. You can taste the Macha and its very pleasant to the tea. I actually enjoyed this plain or with sugar and milk. When I tried the sugar alone, it was too sweet and almost tasted like a candy – for me too much. I will have this tea again – it was surprisingly delightful. Steep this tea for 3 minutes.
Yellow setting with Lemon Drop Mate Tea
The Lemon Drop Mate was served in a Furio Home teapot and enjoyed in Hautschenreuther Selb Bavaria Favorite teacup.
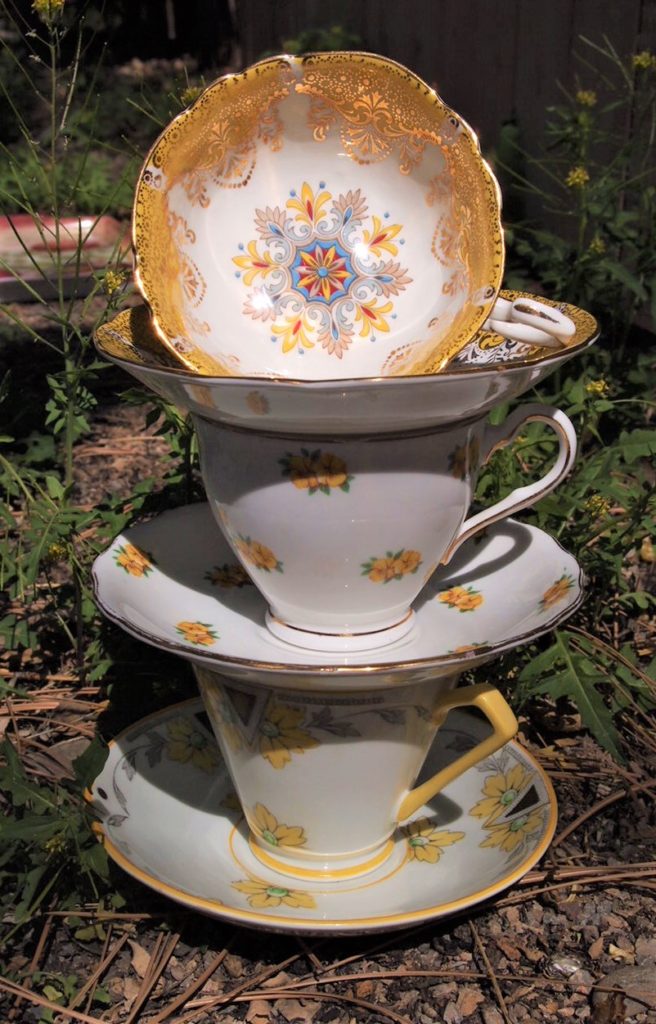
California Hike
Teacups – top Paragon, middle Colclough English Bone China, Art Deco Gladstone China
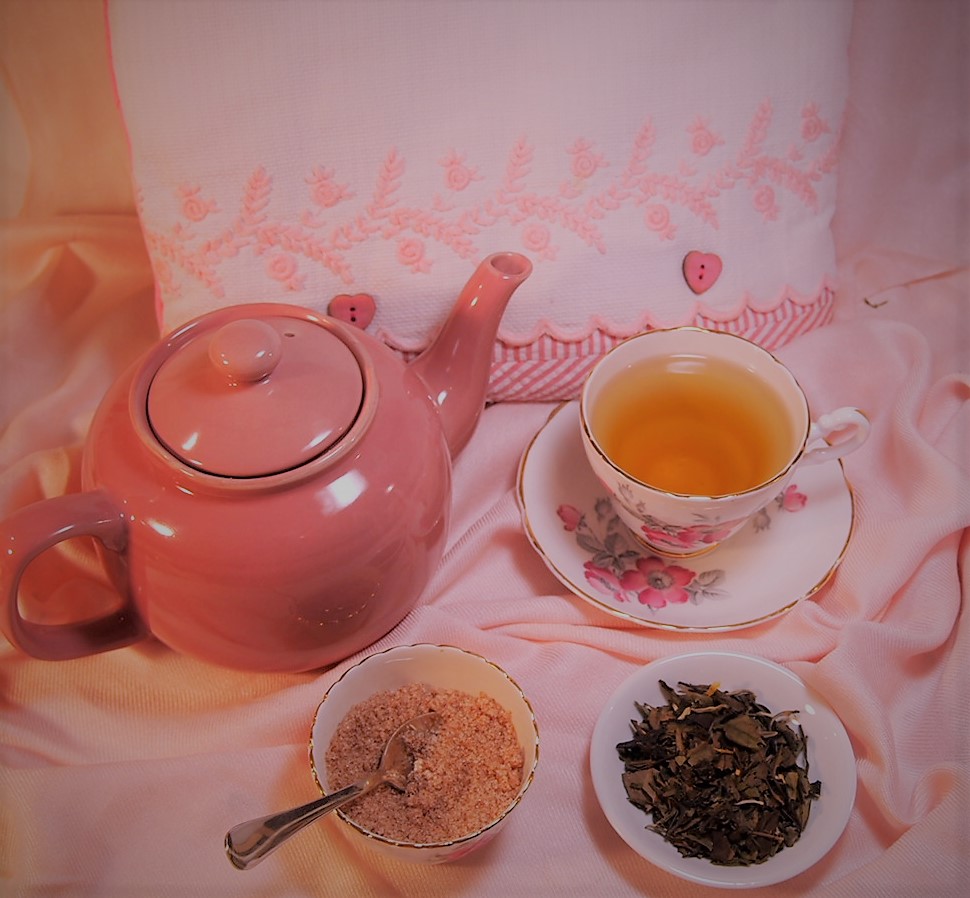
Raspberry Pink Champagne
This Raspberry Pink Champagne is a white tea with the taste of raspberries and a slight fizz of champagne. The tea was accompanied by a Raspberry Champagne sugar. The loose leaf tea is a large lighter green leaf and is rough cut. There is a light hint of raspberry in the smell. Without any additive, the flavor is gentle and very mellow. With a little sugar, the flavor of the raspberries is stronger. Using the Raspberry Champagne sugar was a fun addition and definitely rounded out the flavor. Milk again for me seemed to mellow out the flavor too much. My daughter-in-law found it enjoyable. I have not been a fan of white teas, but I would definitely drink this again. It was delightful. Steep this tea for 3 minutes and yields a beautiful light amber color.
Pink Setting with Raspberry Champagne Tea
The Raspberry Champagne tea was served in an Old Amsterdam teapot and enjoyed in English Castle Staffordshire – floral pattern teacup.
Spring Pink Flowers
English Staffordshire and Royal Vale Pink Floral Teacups
Rooibos Chai
I absolutely love Rooibos teas and this one did not disappoint. This was Rooibos Chai. All the spices of Chai with the tastes of Rooibos. The loose leaf has a spicy fragrance and a beautiful mix of whole spices. The steeped tea had that familiar Chai fragrance along with the dark auburn that Rooibos teas have. It was beautiful. The first taste is clear with the spices but not over powering at all. With a little sugar added, the spices became very clear. A little milk, and it was a delicious blend with a nice creaminess. My recommendation is actually with, without sugar and / or milk. I did receive some Chai Sugar, for me it was a little too sweet and masked the Rooibos flavor. This is definitely one that I will continue to enjoy. And since there is no caffeine in a Rooibos tea, you can enjoy this anytime of the day or evening. Steeping time for this tea is 5 minutes.
Butterfly setting with Rooibos Chai
Chair Rooibos as served with a hand glazed English Cordon Bleu BIA pot and enjoyed in a vintage Rosina teacup.
Butterfly in spring flowers
Focusing on the butterfly, this is a 1950’s Rosina English Bone China teacup
Berry White
This last tea is called Berry White. This is another white tea blend that includes a mix of natural berries – blueberries, raspberries, schizandra berries, strawberries, and hibiscus. Natural flavors of lychee and plums were also present with some jasmine. The loose leaf tea was a beautiful painting of all the berries. Raspberry and strawberry were the prominent fragrance. Once steeped, it yielded a berry colored tea that was reflective of the many combinations adn paired beautifully with the china. Even though it had a somewhat astringent character, the tea was delicious on its own. An addition of a little sugar was okay, it really wasn’t needed for this tea. And no milk. This tea was able to be enjoyed on its own. I will have this tea again and would serve it for a dessert phase of an afternoon tea. This tea is steeped for 6 minutes.
Purple Setting with Berry White tea
Spring Purple Crocus
Berry White Mitterteich Bavaria Violet teacup / Japanese bone china
Mitterteich Bavaria Violet teacup / Japanese bone china
Though our stroll is done, the seasons will continue…the times will change and we can be grateful that the desert once again yields to spring. Did you have a favorite? I hope that this brings you some comforting reflections and reassurance of hope.
The wilderness and the dry land shall be glad; the desert shall rejoice and blossom like the crocus; it shall blossom abundantly and rejoice with joy and singing. Isaiah 35:1
Credits and accolades….
The teas used in this post came from The Spice and Tea Exchange https://www.spiceandtea.com/ Check it out – I am sure you will enjoy it!
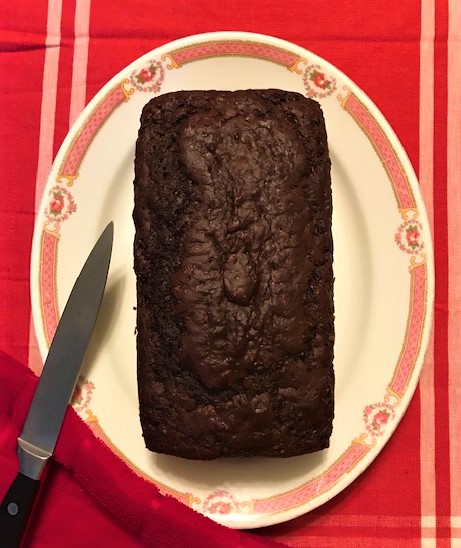
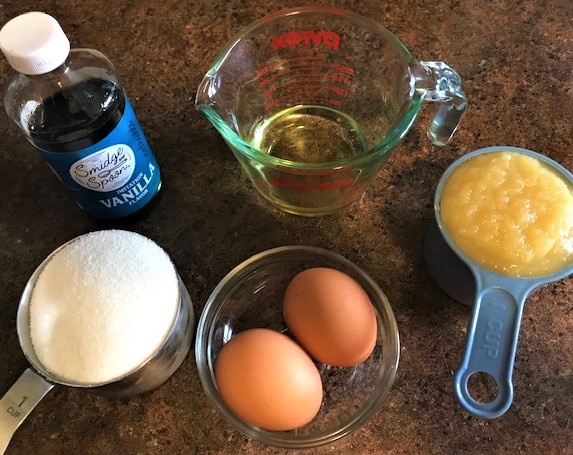
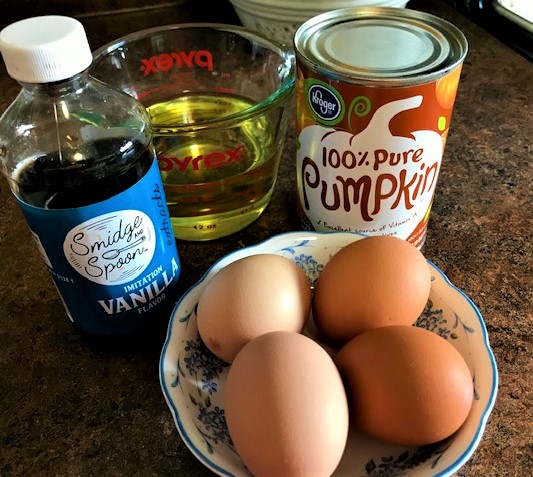
Want a quick bread that is hearty and wholesome and great in flavor? Applesauce Cranberry Quick Bread combines both all purpose flour and whole wheat flour while getting it moistness from the applesauce. Fill your afternoon’s with this treat. Let’s put this bread together!
Ingredients
Whole wheat flour
All Purpose Flour
Baking Soda
Baking Powder
Salt
Nutmeg
Cinnamon
Unsweetened applesauce
Eggs
Milk
Oil
Vanilla
Dried Cranberries
Preheat your oven to 350 degrees and prepare one 9×5 load pan. I spray with cooking spray and line the bottom with parchment paper.
Combining Wet Ingredients
Wet ingredients
In your stand mixer, combine unsweetened applesauce, sugar, eggs, milk, oil and vanilla. Using the paddle attachment, mix thoroughly.
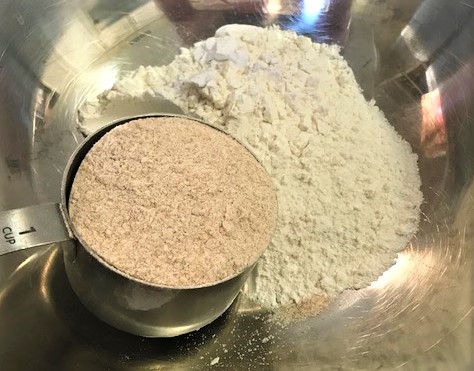
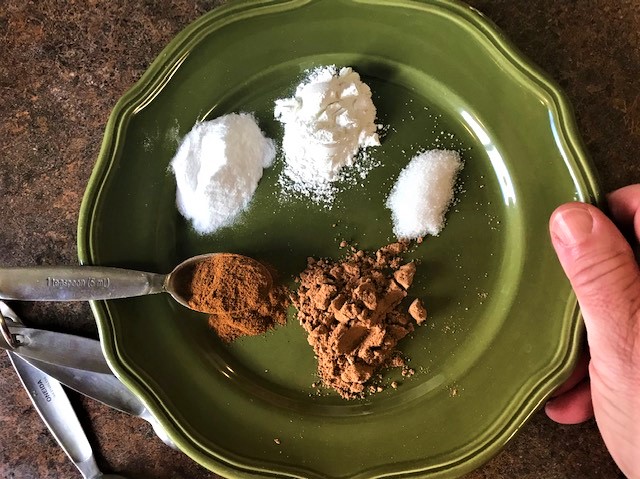
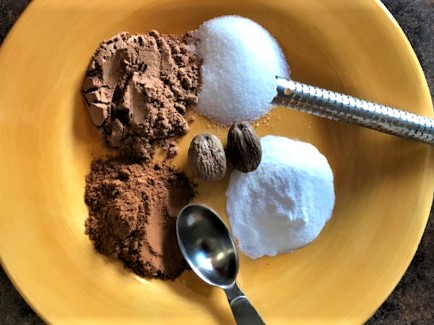
Preparing Dry Ingredients
Whole Wheat and All Purpose Flour
Nutmeg, Cinnamon, Baking Powder, Baking Soda and Salt
In a separate bowl, combine the whole wheat flour, all purpose flour, baking soda, baking powder, and salt. Prepare your spices – nutmeg and cinnamon. I like to grate my own fresh nutmeg – once you do this, you will be sold on the flavor and the aroma. Mix together to incorporate all the ingredients.
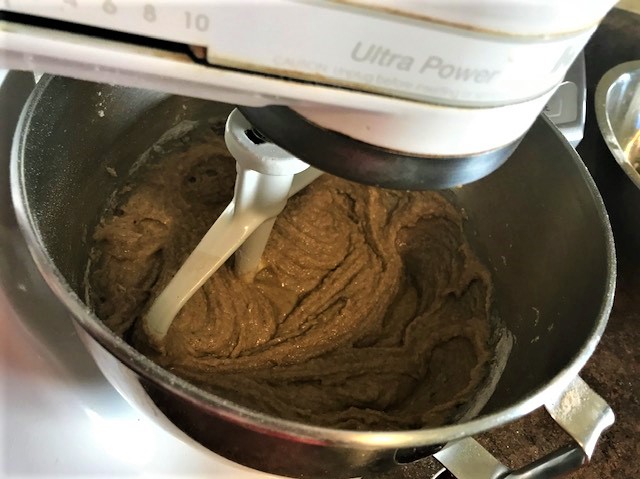
Putting It Altogether
Combined dry and wet ingredients
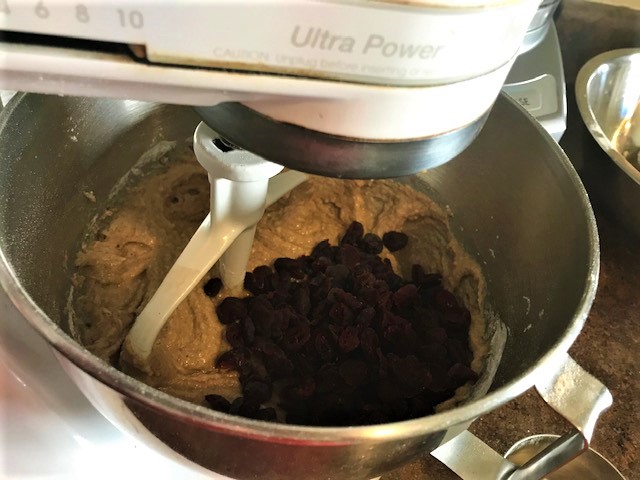
Adding the cranberries
Finished Batter
Using your mixer and paddle attachment, add the dry ingredients to your wet ingredients. Once combined, add your cranberries and mix just until incorporated.
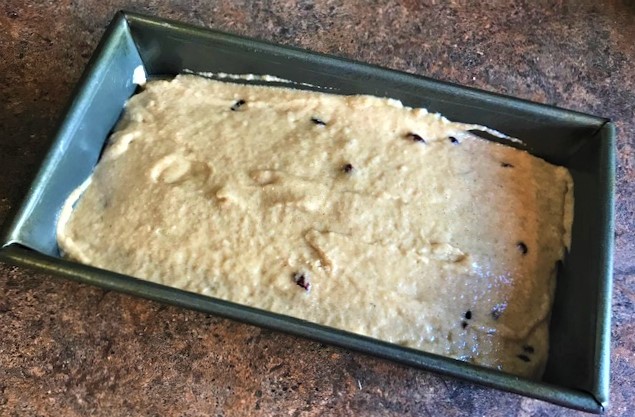
Batter in loaf pan and ready for the oven!
Batter will be thick but can be poured into your baking pan. Bake for 60 minutes or until a tester or wooden skewer come out clean. Let cool for 10 minutes on a rack before removing from the pan. Then allow to cool completely on a rack.
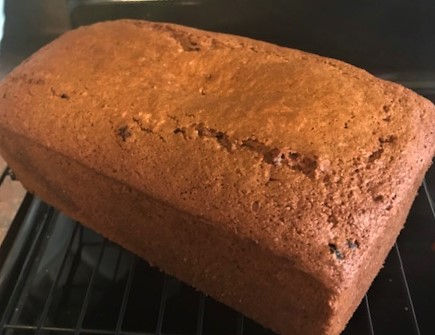
Fresh out of the oven!
Your Applesauce Spice Bread should be stored in the refrigerator up to 1 week or in the freezer for up to 6 months.
Serving Suggestions
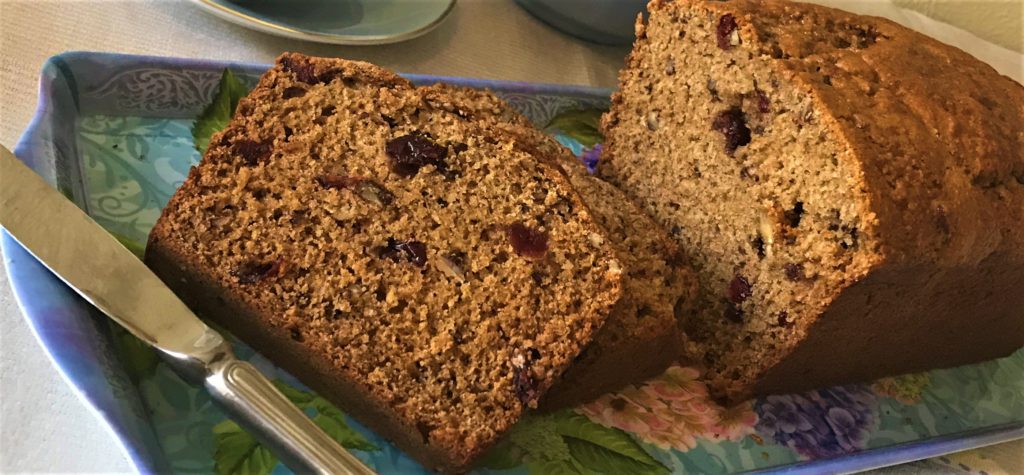
This is a hearty and moist quick bread, flavored with the spices and cranberries. The combination of both whole wheat flour and all purpose flour give it a wholesome texture.
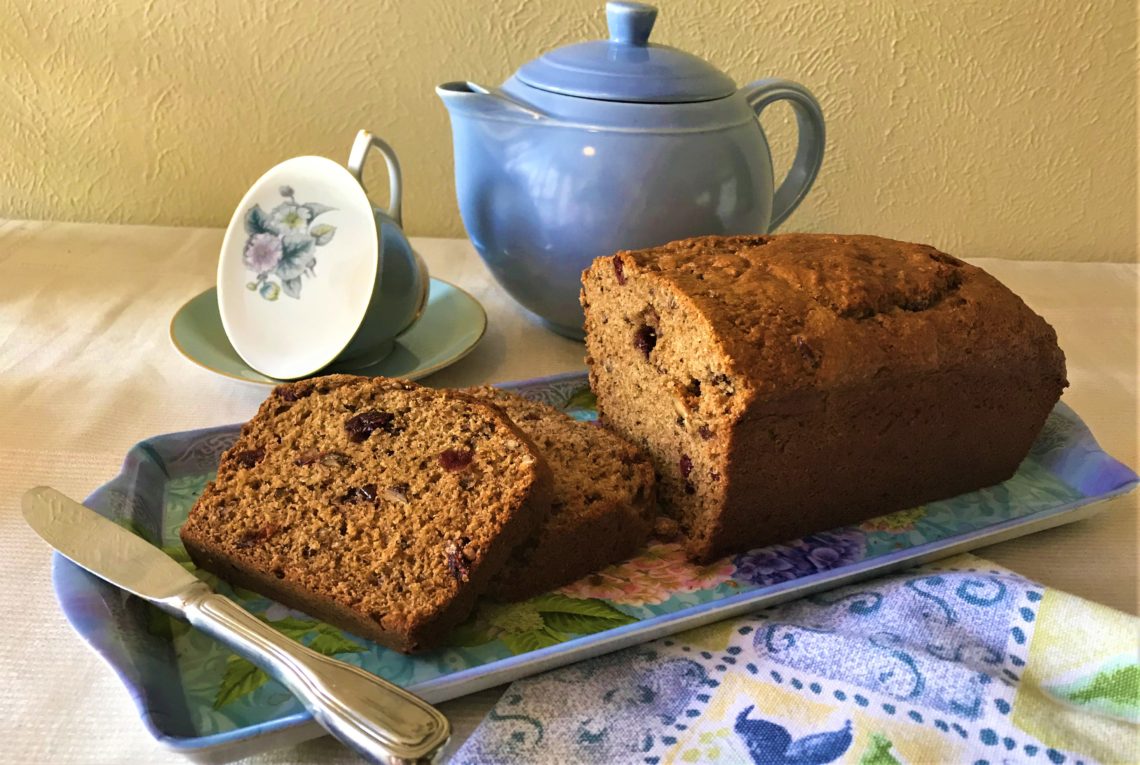
Sliced Applesauce Cranberry Quick Bread
I generally will serve this by itself, with butter, whipped cream or Devonshire Cream. Even a spread of cream cheese is delicious on this bread. However you choose to enjoy, it will be delicious. Of course, don’t forget that hot cup of tea. English Breakfast perhaps!
The follow products were used for this recipe
This post contains affiliate links and I may earn compensation when you click on the links at no additional cost to you Look through the products and enjoy!
This quick bread is a mix of spices, cranberries and applesauce in this moist quick bread made with a combination of all purpose flour and whole wheat flour. A light yet hearty bread good for any season.
Prep Time 15 minutesminutes
Cook Time 1 hourhour
Resting Time 10 minutesminutes
Total Time 1 hourhour25 minutesminutes
Servings 12servings
Ingredients
1cupsugar
1 cup unsweetened applesauce
¼cupoilvegetable or canola
2eggs
3tbspmilk
1tspvanilla
1cupwhole wheat flour
1cupall purpose flour
1tspbaking powder
1tsp baking soda
¾tspcinnamon
½tspnutmeg
¼tspsalt
1cupdried cranberriesany flavor
½cupfinely chopped pecansoptional
Instructions
Preheat oven to 350. Spray 9×5 loaf pan and line the bottom with parchment paper.
In a large bowl, combine sugar, applesauce, oil, eggs, milk and vanilla with electric mixer until well combined.
In a second bowl, combine all dry ingredients and then add to wet mixture, mix well.
Fold in dried cranberries.
Bake for approximately 60 minutes or until tester comes out clean. Don't overbake – bread will be dry. Cool 10 minutes on wire rack before removing from pan.
Notes
Store bread in refrigerator for up to 1 week. This bread freezes well for up to 6 months.
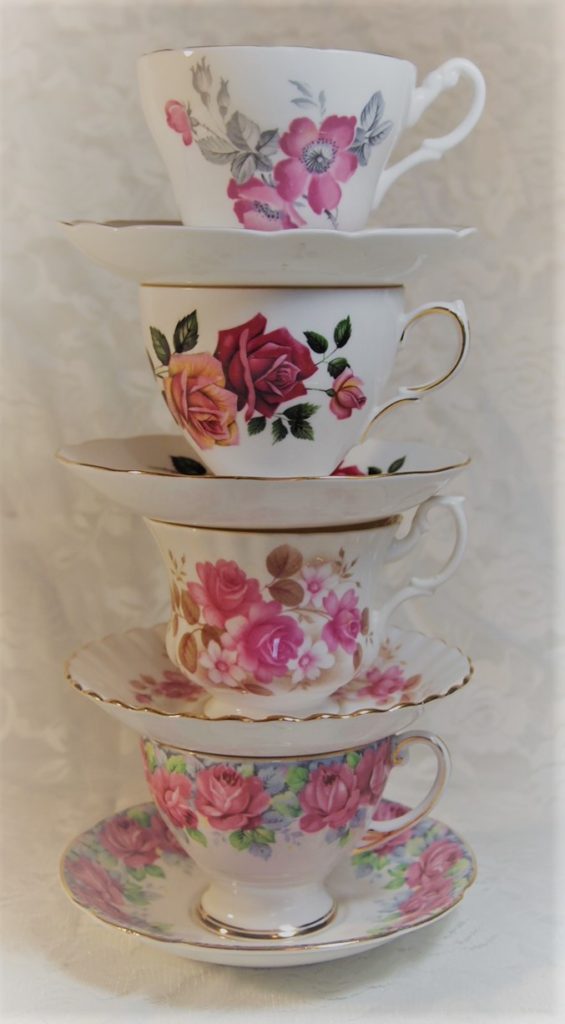
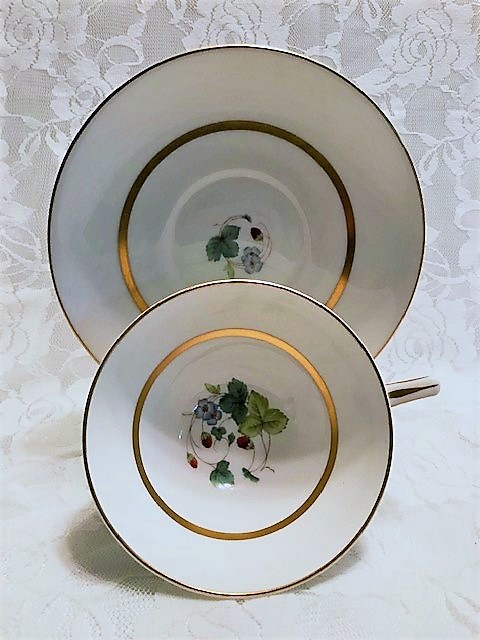
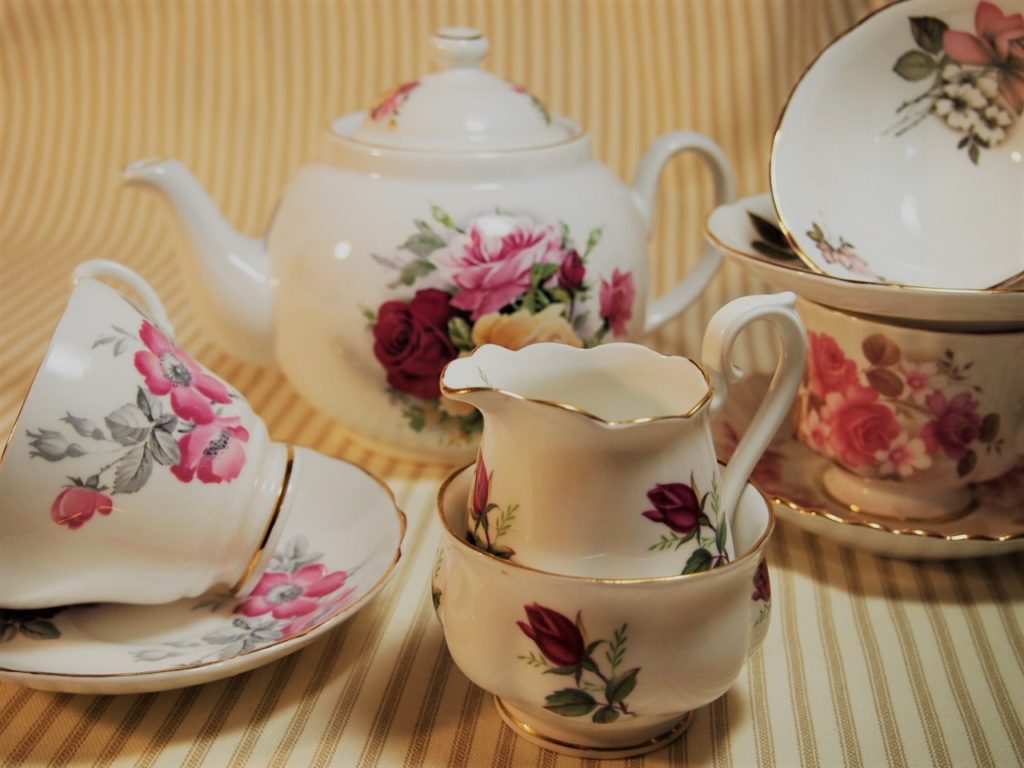
One of the things I love to do is antique shopping, especially for vintage china. I love scouring through the shelves and shops, looking for special treasures. I enjoy seeing the variety of items in these places, many with such a broad range of things, all the while imagining the life of the item, who held it, how was it used. Junk to some, treasures to others. It becomes an antique adventure.
Beth ready for the road trip!
Another thing I love to do is drive. I had a great job one time that allowed me to travel around New Mexico seeing all the diversity and beauty of this state from the road. Going into the small communities – it was a blessing. Great memories learning about the culture and the heritage – such a variety.
When I have a chance to combine the two – I jump on the opportunity. And that is just what I recently did. Packed up my bags, put on some tunes, and hit the road to travel from New Mexico through to Iowa. Taking a little longer path, I crossed several states – New Mexico, Texas, Oklahoma, Kansas, Missouri and finally Iowa. And now it becomes Antique Shopping On The Road!
Road Map of Trip to Iowa
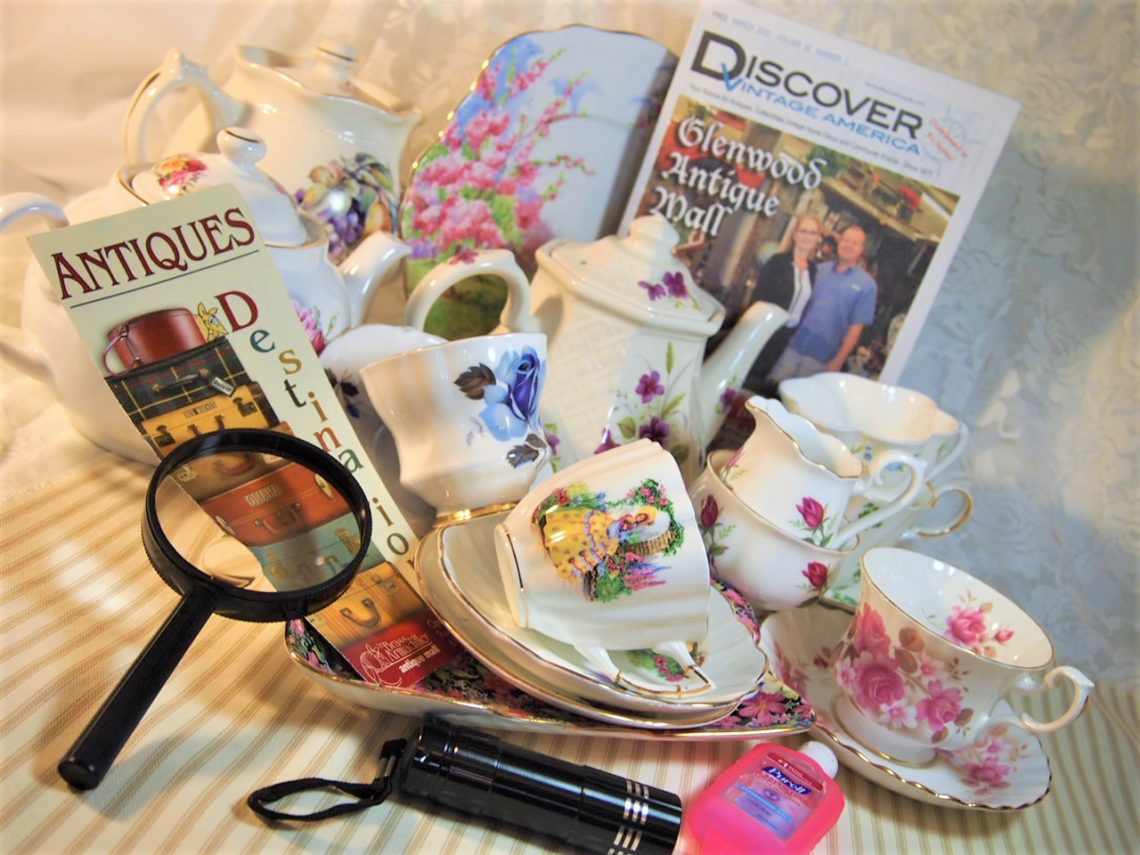
Here are some of my stops. Come along with me and join the journey. With my China Shopping Toolkit in hand I set out to find me some treasures!
China Shopping Toolkit
Not new to those of us who hunt out these little gems but critical when looking at vintage or antique items, the tools, tricks, and guides to finding these beauties is critical.
My first stop was in Oklahoma City at the Warehouse Antique Mall https://www.facebook.com/TheWarehouseAntiqueMall/ . Though near closing time, the proprietor was very pleasant and allowed me to browse with the one stipulation that I come back on my way back through. While there I found a couple treasures.
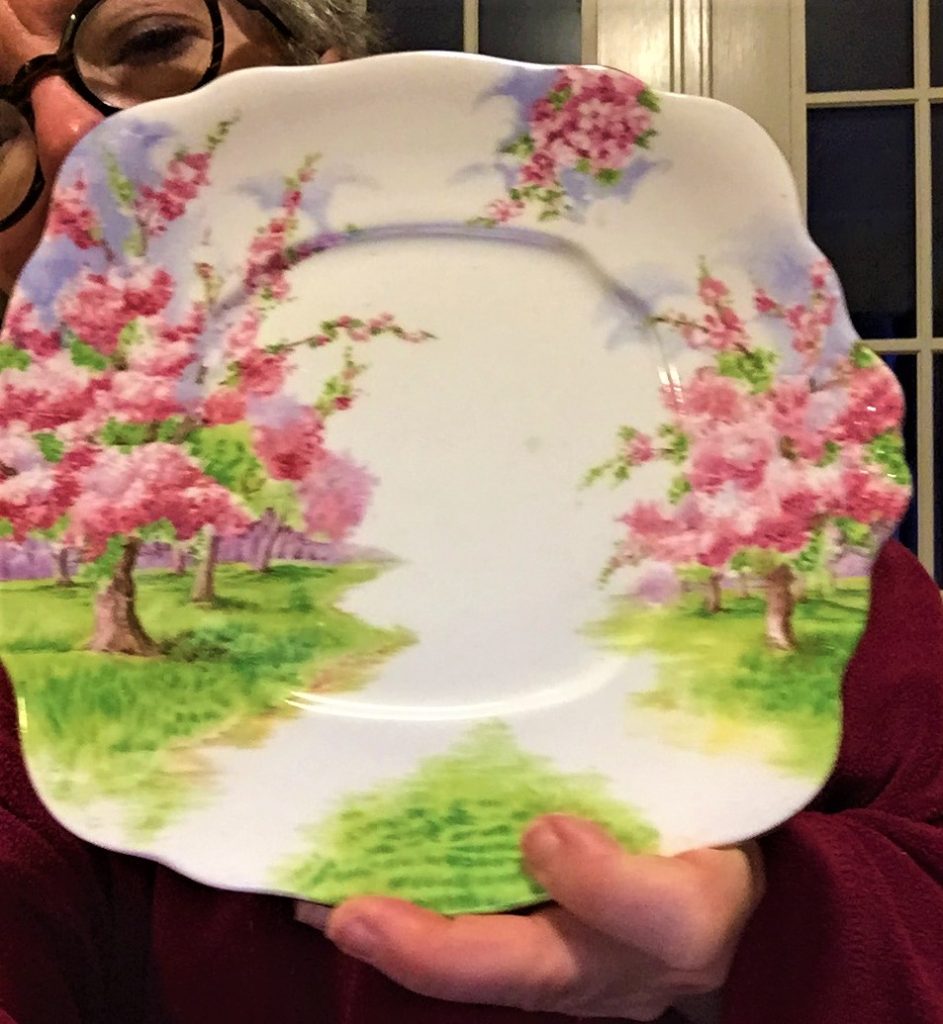
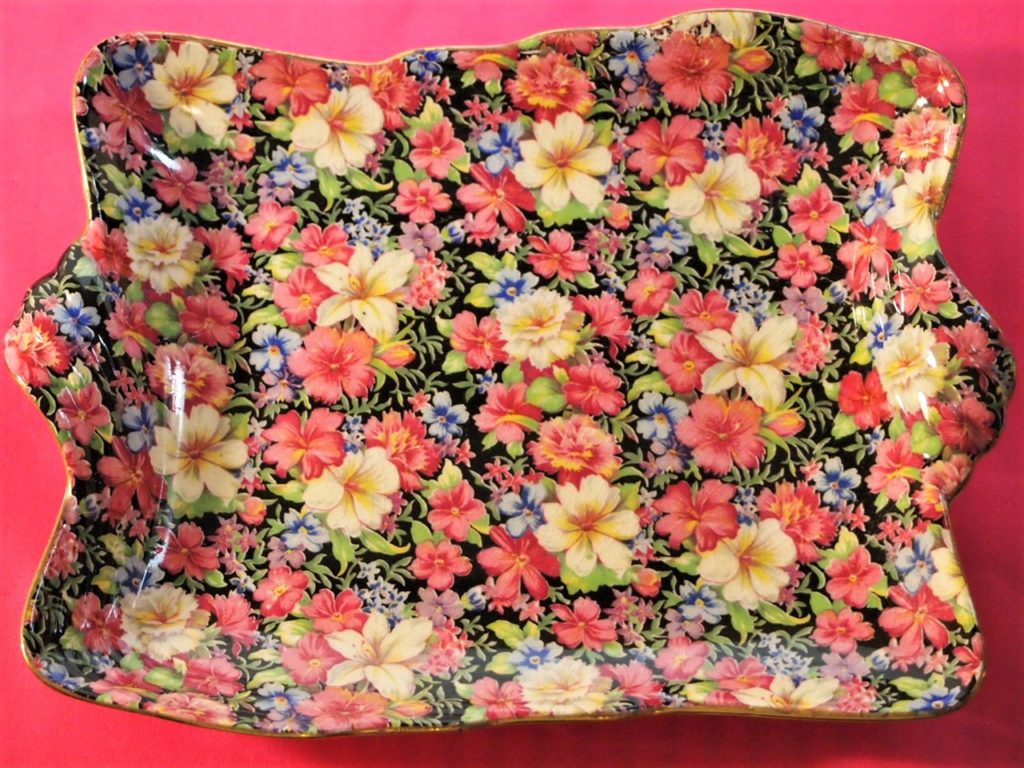
Pictured below is a Royal Albert Blossoms Time plate. This pattern was requested in 1933 by G. R. Palmeter who wanted to have a pattern created reflecting apple blossom time and to tie in with the Apple Blossom Festival. This plate will serve slices of cake to delight my afternoon tea guests.
Royal Albert Plate
The Enchanted Frog – Lathrop Missouri
I find driving very relaxing. While driving, I check signs to see any opportunities I will take. The Enchanted Froghttps://www.facebook.com/enchantedfrogantiques/was exactly just one of these spots. I had seen these signs a couple times on my travels, but this time I decided that I would stop and check it out. To my delight and surprise, it was just off the interstate in Lathrop Missouri – quick on and off, so I was able to spend more time in the shop.
Like many shops, they look small from the outside but once in – these shops can go on for miles. Boasting of 60+ vendor booths, it was a nice respite while on a long drive. When you enter, prepare to remove your purse no matter of the size. It’s a precaution to not bump into things on the shelves. Put into your locker, you grab the key and are on your way. Though I wear a small purse over my shoulder, I completely appreciate the request but kept my antique shopping toolkit. No purchases at this shop (not this time around) but certainly on the list to check out again.
THE BRASS ARMADILLO – Iowa
The Brass Armadillo – Ankeny Iowa
Once in Iowa, my daughter suggested that I check out the Brass Armadillo https://www.brassarmadillo.com/This store boasted of over 400 vendors and once in the store, it was clear this was an antique shoppers’ heaven. I made some significant purchases while there. The store is clean and you are pleasantly greeted by your host, explaining how the store works making sure to offer you water or coffee. Then you are set free. And it was fun for sure. With my cart to collect purchases, I started through the organized lines of booths.
Brass Armadillo Logo
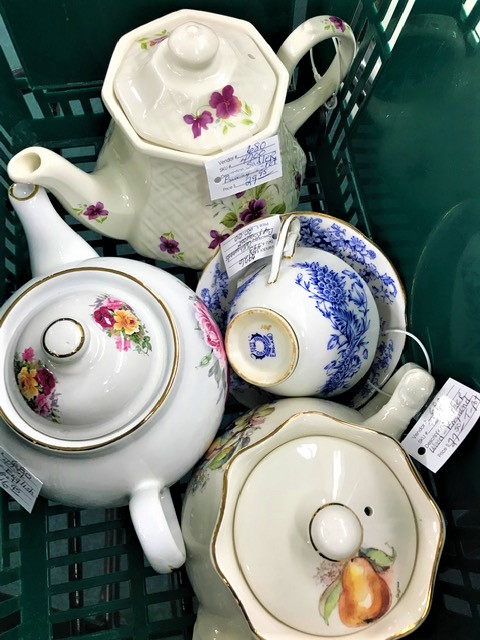
Teapots in the cart and ready for purchase
I did learn that this is one of several shops part of an antique store chain. Generally Midwestern and Southwestern in location, I would readily recommend this to anyone in the area. Prices reasonable, it was a very pleasant experience. And I will definitely be checking out some of the other locations as well as keeping this one on my list of “always stop to see what’s new.”
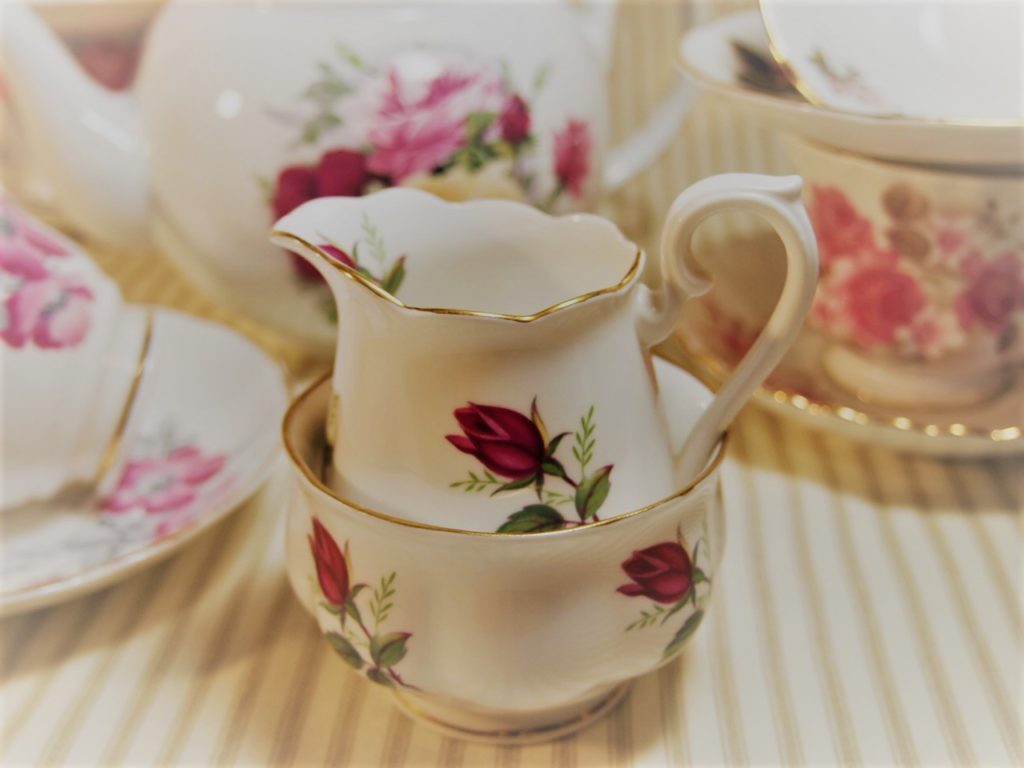
One of many purchases, this sweet little creamer and sugar is Hamilton Bone China.
Hamilton Cream and Sugar
ANTIQUES IOWA – Iowa
Antique Iowa, Story City Iowa
I visited another Iowa antique store that had been recommended by one of my New Mexico antique store owners. They had commented to me that this is one they always stop for. So my daughter and I braved the elements (yes it was snowing) to check out Antiques Iowa https://www.iowaantiquenetwork.com/ .
And once again, we thought it would be small but it surprised us both and revealed series of hallways with treasures galore. Maybe a reflection of the heartiness of Midwestern people (of which I am one), the store was pretty full of folks out shopping for those special finds. Like many stores, employees will circulate and see if you need to have your selections taken to the front. And what that does? Frees your arms up to hold more things!!!! And of course I had to comply.
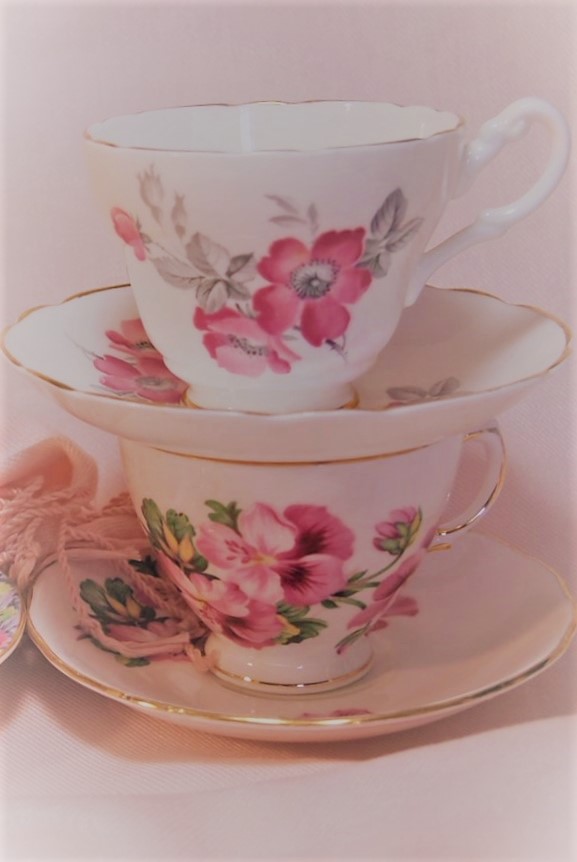
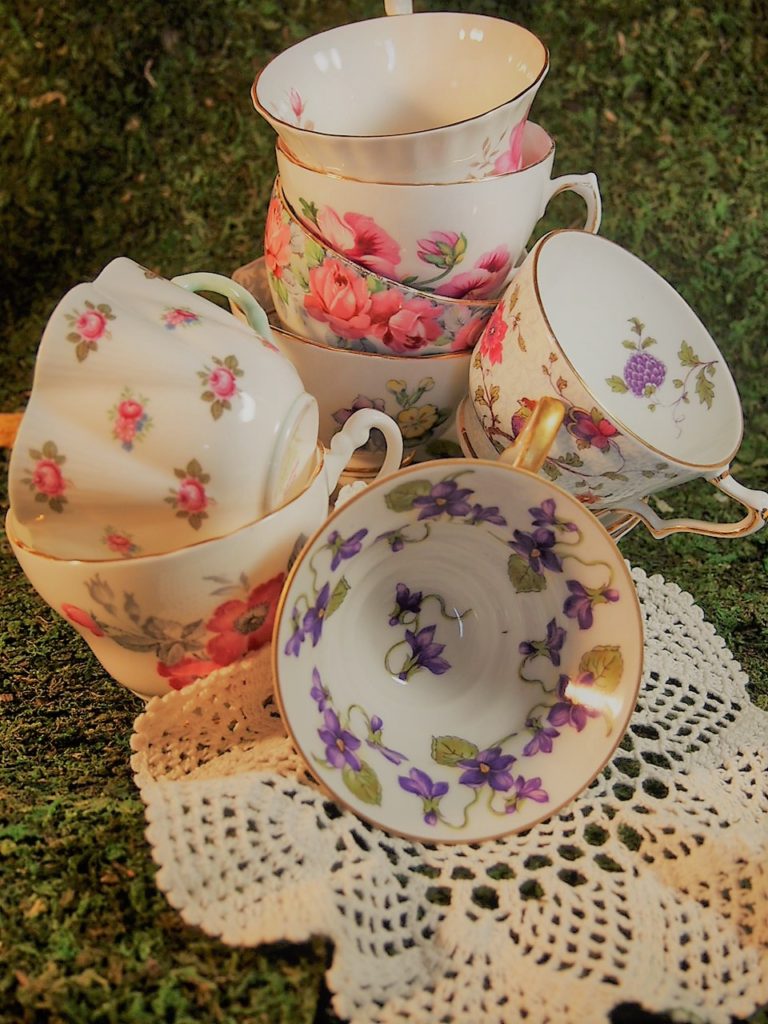
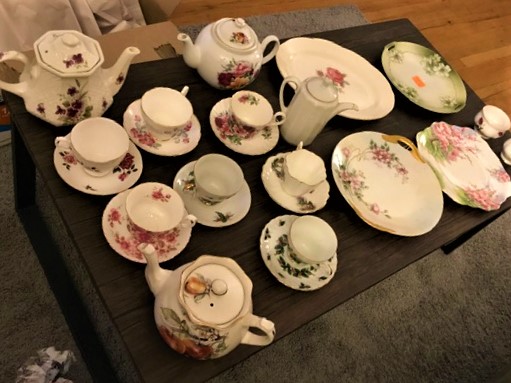
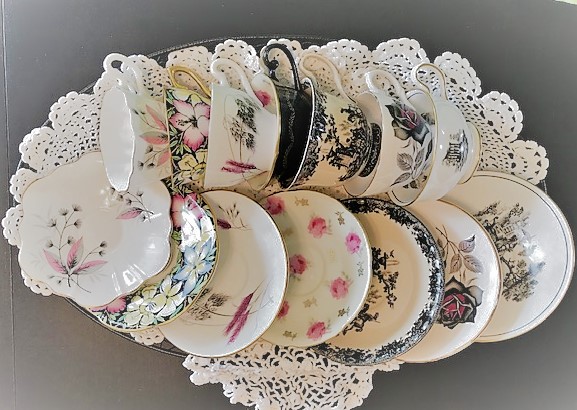
This is just a sampling of many cups obtained along the way.
Vintage China Cups
BRICK STREET MARKET AND CAFE
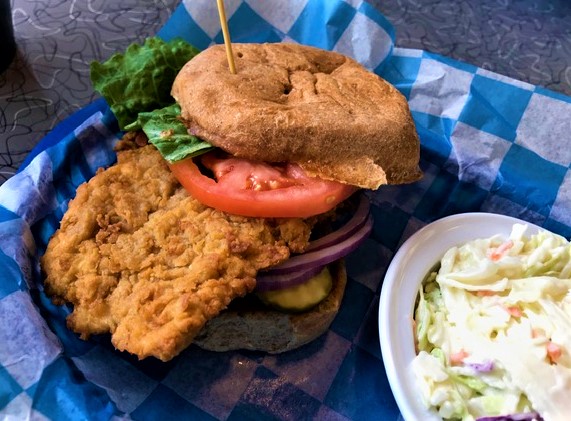
It was time for lunch and you can’t go to the Midwest without stopping to have something iconic to eat. And for us, that would be the pork tenderloin sandwich. We took the opportunity to stop at the Brick Street Market and Cafe https://www.thebrickstreetmarket.com/ in Bondurant, Iowa and were delighted to have one of my favorite lifetime sandwiches.
Brick Street Market and Cafe, Bondurant iowa
Pork Tenderloin Sandwich and Cole Slaw
Now I grew up in the Midwest and don’t really understand folks who don’t embrace the allure of a great pork tenderloin sandwich. So this was a treat for sure. Though this isn’t the only place that you can get a great tenderloin, it came highly recommended and they were not wrong. You can sit up to the counter in true diner style or sit in a booth. But make sure to enjoy with mustard, pickle and onion. I can still taste it! Do you think there is a mail order option for this?!?
MEMORY LANE
Memory Lane Antiques, West Des Moines Iowa
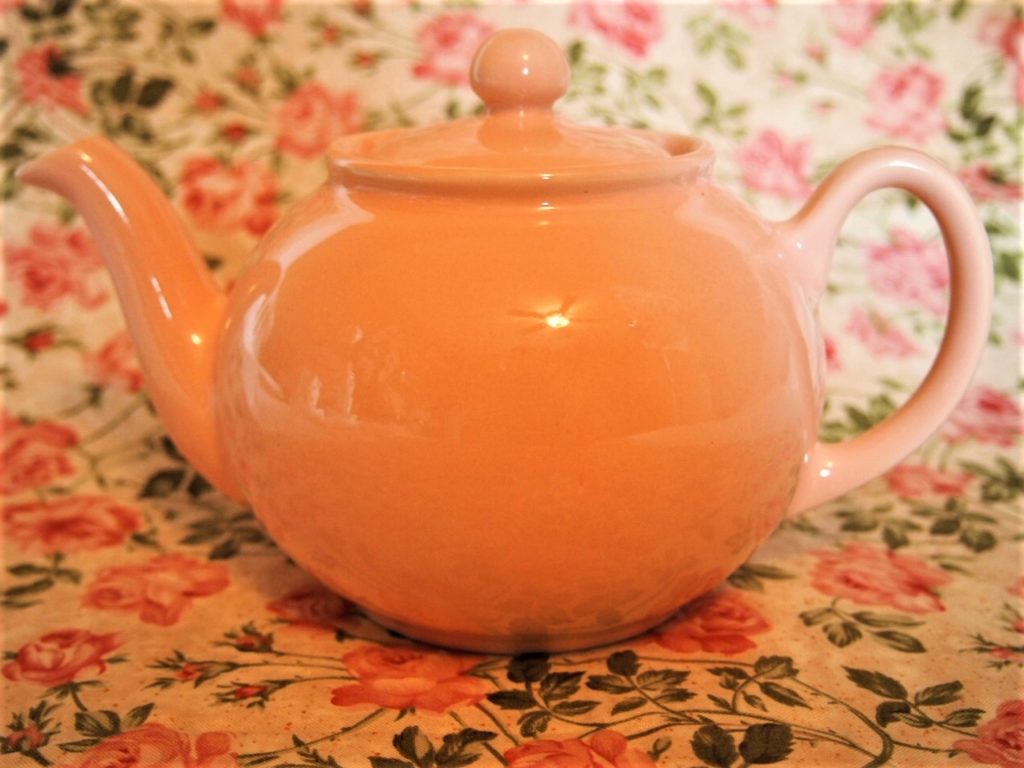
Our last stop was Memory Lane in West Des Moines Iowa. https://www.memorylaneantiquesvalleyjunction.com/. This little shop in downtown was another little treasure. A mix of boho vintage and antique, this shop was a sweet way to end a long hunting adventure. A sweet little pink teapot was my purchase here. Just perfect for morning tea.
This little teapot is a Pristine from England. Pristine was a unique English pottery. They made almost exclusively teaware: teapots, creamer and sugar sets, milk jugs, and teacups. Now out of production for over 10 years, this Staffordshire Pristine teapot is a sweet little find.
Pristine Teapot
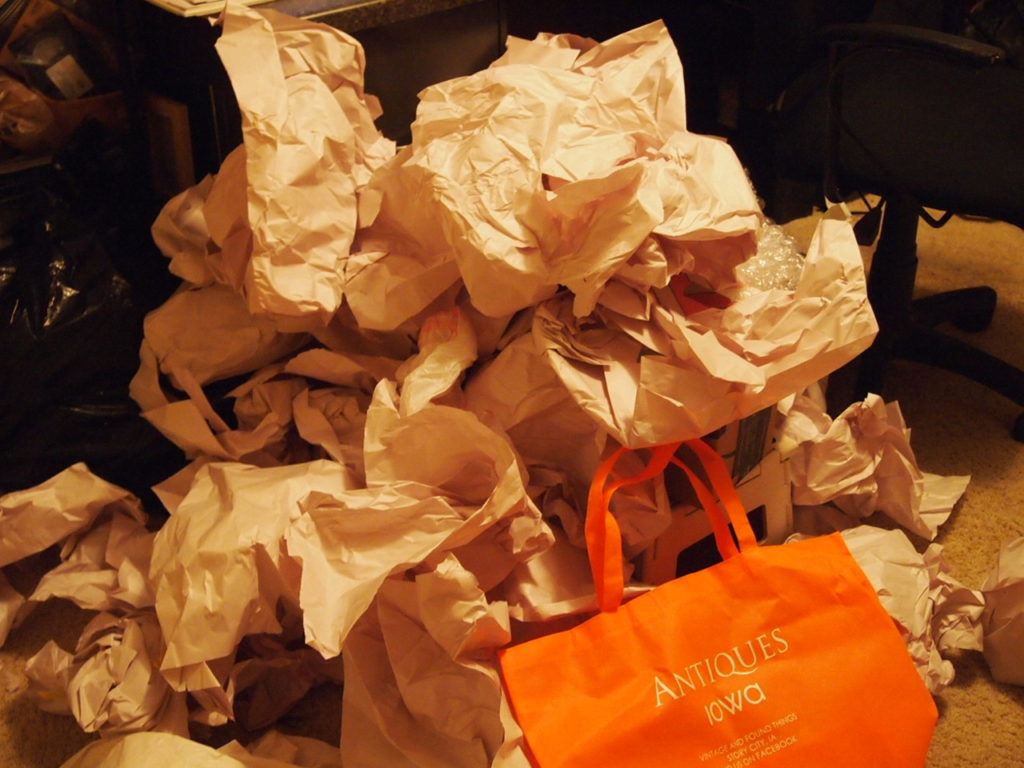
Now home and sharing my shopping adventures with you. Nothing serious, nothing dramatic, just simple pleasures. For those of you who enjoy the antique shopping experience, you will recognize the large pile of wrapping paper below. Yup – it was that much. It was a delightful and successful adventure.
The wrappings of my trip!
I would highly recommend if you drive through small communities, learn about them and meet the people, even if in a small way. Share a bit of your journey….those serving you will smile…it makes their day.
Collected Treasures – only 1/2 of the finds!
“I love older things that people have used and cherished. They have personality, character, and soul.”
Shopping for vintage china can be a little overwhelming. You want to enjoy the piece but also make sure you are purchasing something that is of reasonable value. Here are some tools for vintage china shopping to help you get started.
What is vintage china?
There is a big difference between antique and vintage. A true antique as defined by the United States Customs Service as an object that is 100 years of age or older. That bare-bones definition keeps things pretty simple to grasp most of the time. Whereas vintage china definition is not as well defined. So it could mean something less than 100 years old or something that was once in fashion and is now returning (like 70’s fashions). For me, vintage china is anywhere between 50 to 100 years old. It would contain all styles or types, and maybe even some wear and tear, but does not fit the definition of antique. With that defined, my focus is vintage china.
Why should I buy vintage china?
There are all sorts of reasons why you might consider buying vintage china. Sometimes it is for the collectability of an item or for personal use or gifting. I find that vintage china is not as expensive as antique and allows me a greater selection to choose from. I use my vintage china for personal use, for business opportunities, and also for gifting. A vintage teacup allows me the flexibility to share my love of tea with someone and it just looks sweet, setting the stage for enjoying and relaxing. It gives me a moment of treating myself in a way that doesn’t require a lot of investment.
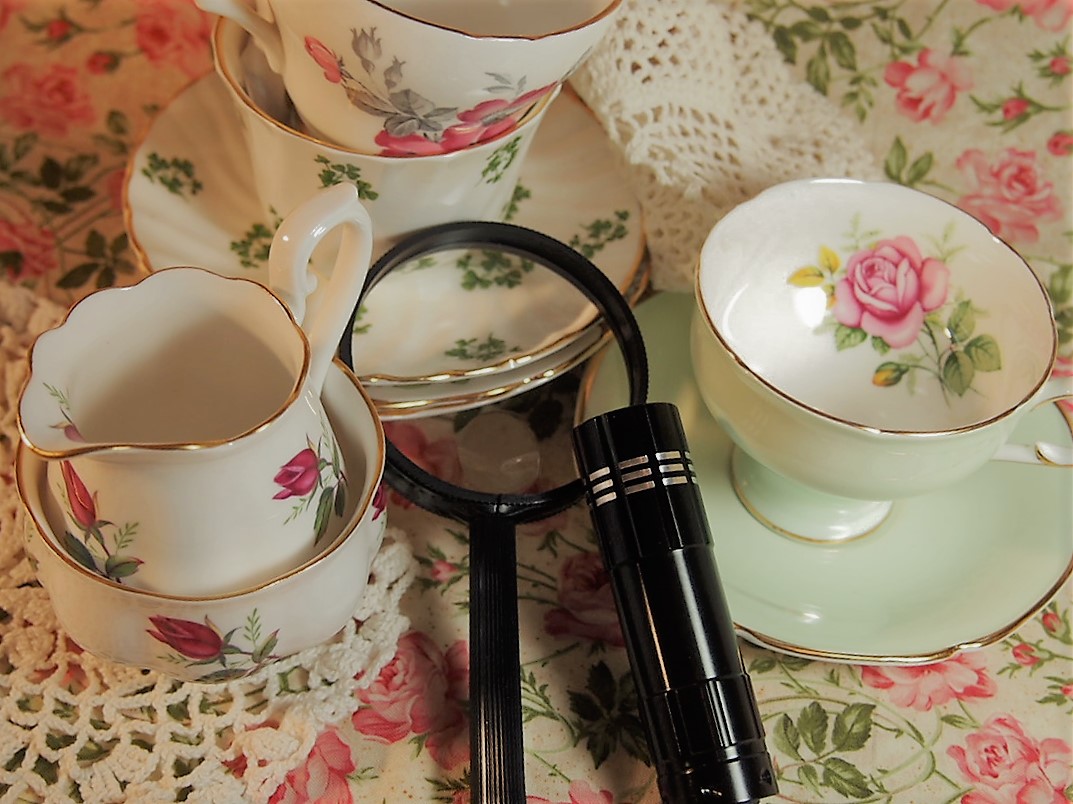
What is my China Shopping Toolkit?
My China Shopping Toolkit are 4 things that I use anytime I
go china shopping.
China Shopping Toolkit
Small
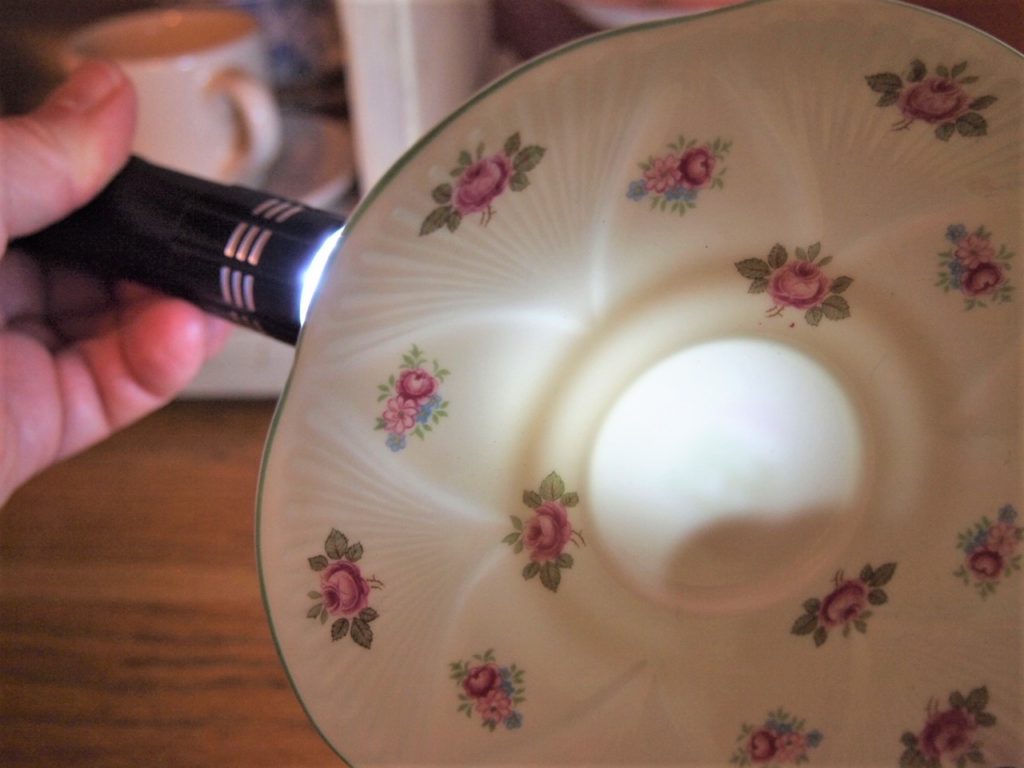
flashlight – you want to have enough light to look at the piece of china,
allow it to shine through and show any cracks or chips.
Magnifying
glass – Yup – pull out the ol’ detective mode and check out the piece.
Your
fingers – So this might seem silly but you want to run your fingers along
the surfaces. Go around the edges of the
saucer, plate, and rims of the cup. Feel
for any roughness and determine if it’s a crack or flaw. Check out the spout on those teapots – cracks
or chips on the spout are a definite no go.
Hand
sanitizer – This business can be dusty and dirty – so make sure your hands
are cleaned afterwards. Don’t be
surprised if you feel a bit grimy.
So this is extremely important. There are things you want to look for to make your investment, no matter how much or how little, reasonable for you. I buy things I like but I want them to be of good quality. So here are some definitions that are important for you to know.
Using your China Shopping Toolkit, examine for cracks, crazing, chips, defects. Some defects do not lower the value or use and in fact might be part of the production process. However, some do reflect damage and will help you determine the condition of the piece.
Here are some important items to look for
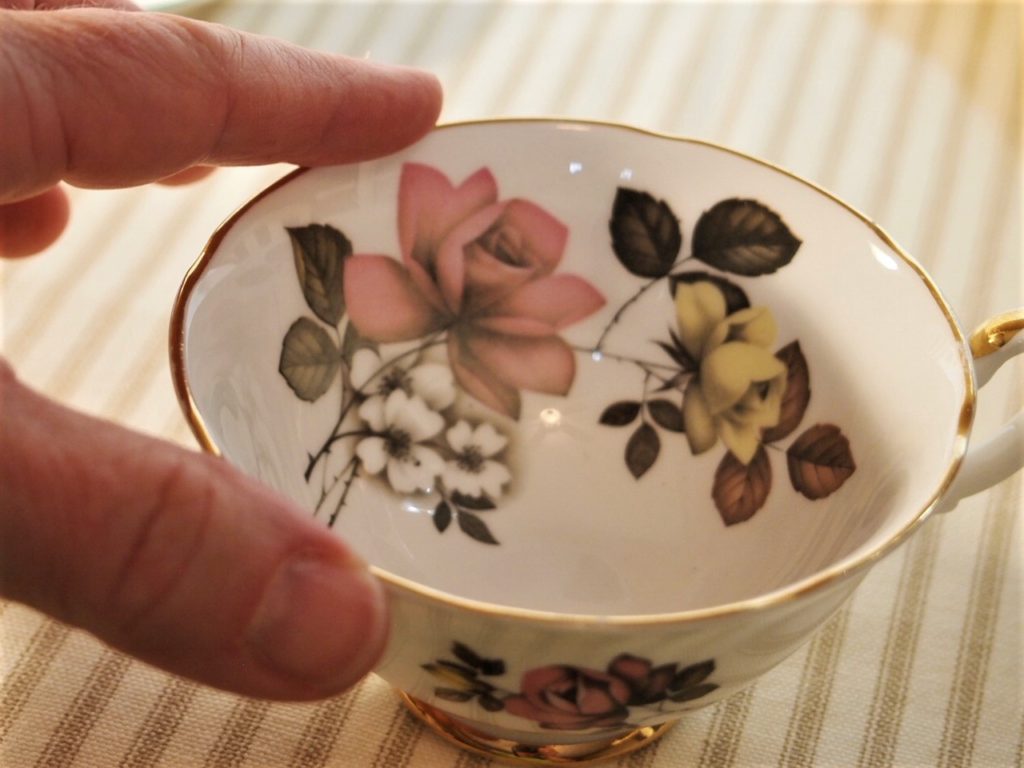
First examine the vintage china piece
Visually inspect the outside and inside of the china.
Run your finger around the edge of the piece. You are feeling for any roughness or chips on the piece. I do not purchase pieces that are chipped or have roughness on the edge.
Checking for chips or roughness around the rim
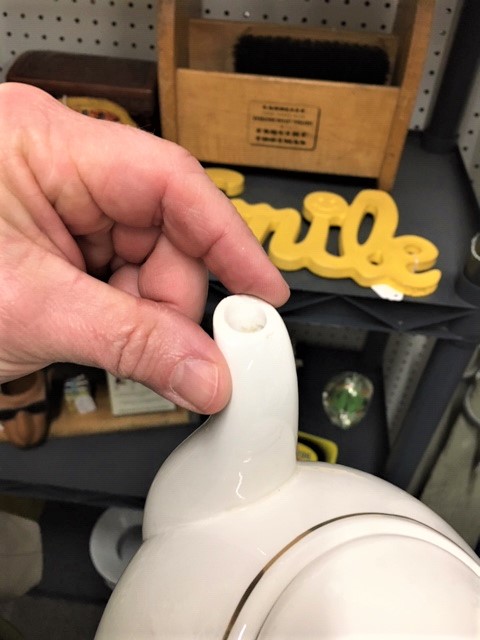
If you are purchasing a teapot, make sure to examine the spout for any roughness or chips. You will frequently find this in vintage china. I do not purchase teapots with a damaged spout.
Checking for roughness or chips on a teapot spout
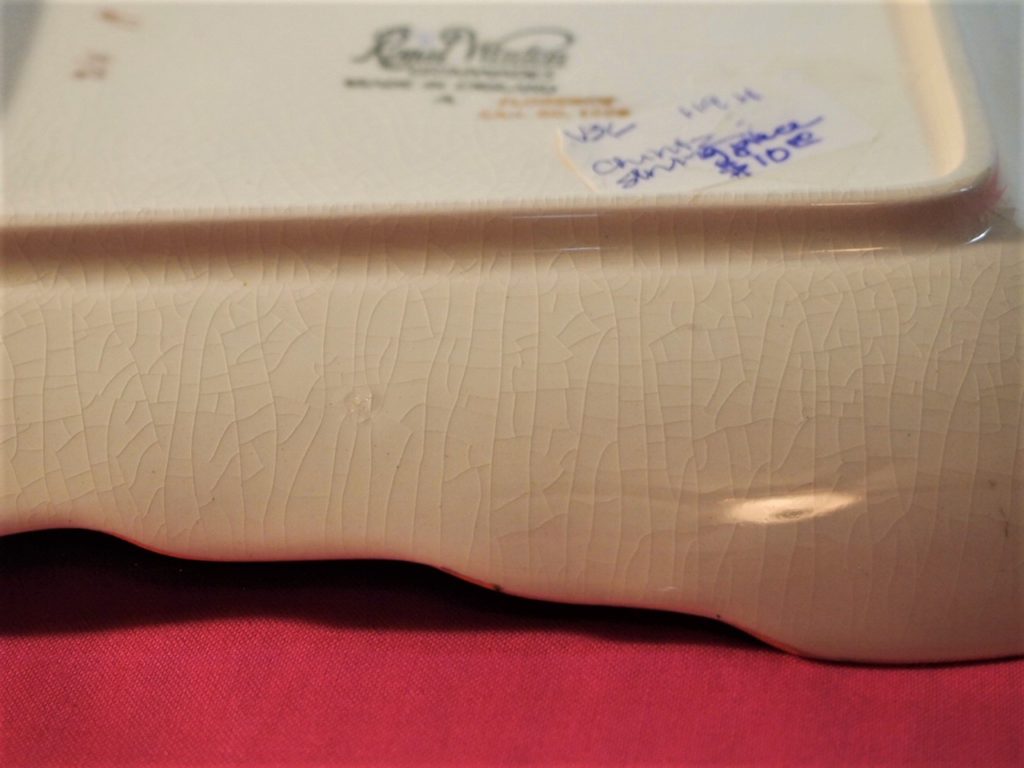
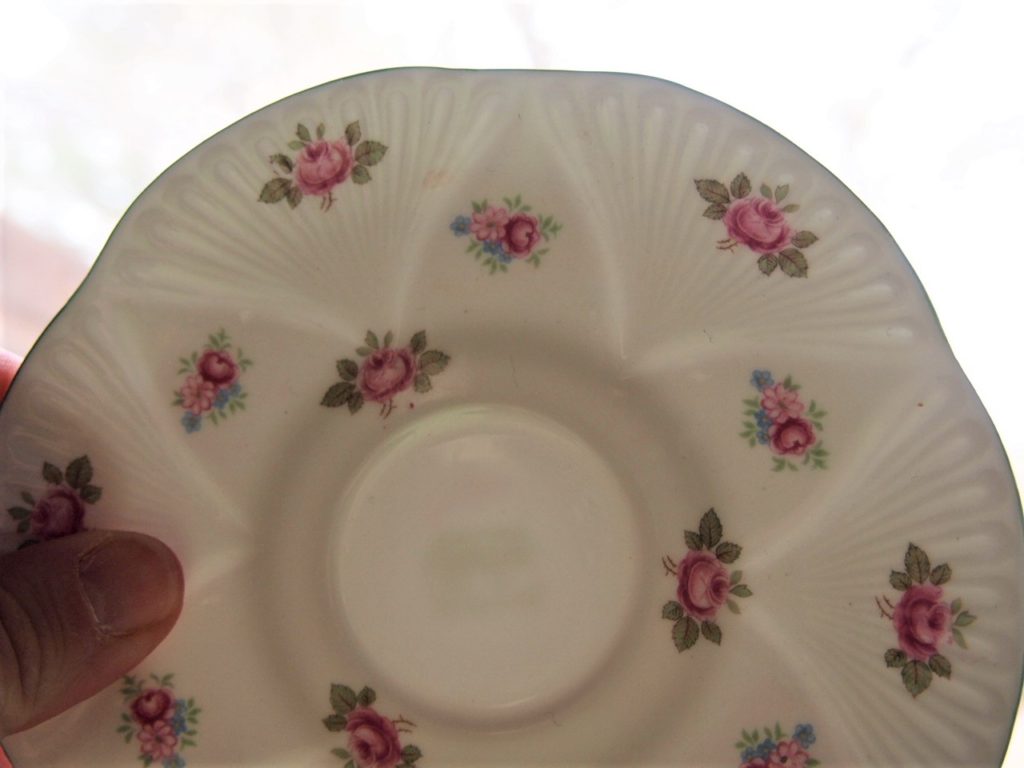
3. Examine the piece for crazing.
Crazing is the fine crackling one often sees on many glazed pottery pieces and on certain types of antique porcelain. Crazing is in the glaze and is not detectable when one rubs his or her fingernail over the crazing. Crazinggenerally does not affect the use of the item and is present in much Art pottery. I will purchase a piece with crazing on the outside or underside. YOU NEED TO DETERMINE IF IT IS EXCESSIVE AND SOMETHING YOU CAN LIVE WITH.
Example of CRAZING on bottom of Chintz plateTop side of Chintz plate
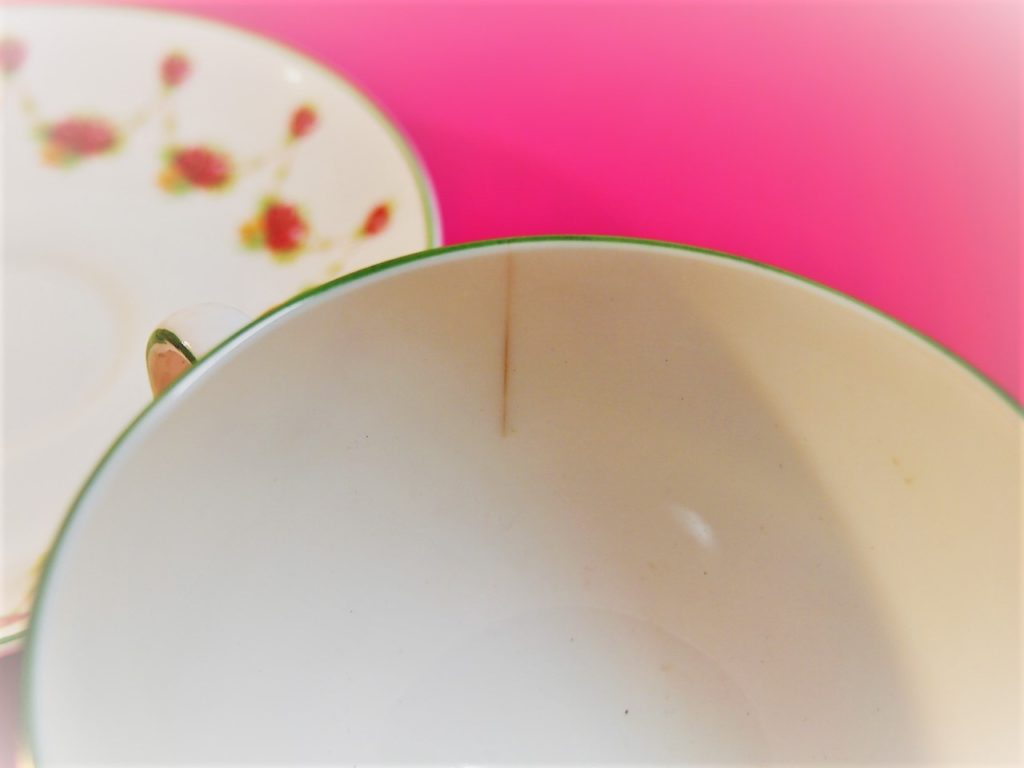
4. Inspect the piece for any cracks. Use your flashlight and magnifying glass. Run your finger over the crack to see if you feel it. I will not purchase a piece of vintage china with cracks.
A hairline crack is a crack that goes into or through the clay body and can be felt with a fingernail. In some instances, new collectors and less than reputable dealers will refer to hairlines as crazing. If the crack is into the clay and is detectable with a fingernail it is not crazing. VERY IMPORTANT TO DETERMINE
Example of crack on outside of teacup
Example of crack on inside of teacup
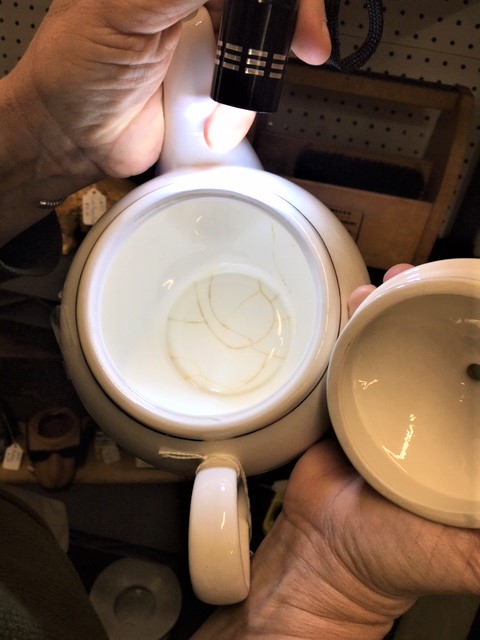
Looking for cracks on the inside of a teapot
Use your light to help determine if there are cracks. Or hold the item up to the light.
Using a flashlight to look for cracks
Using natural light to look for cracks
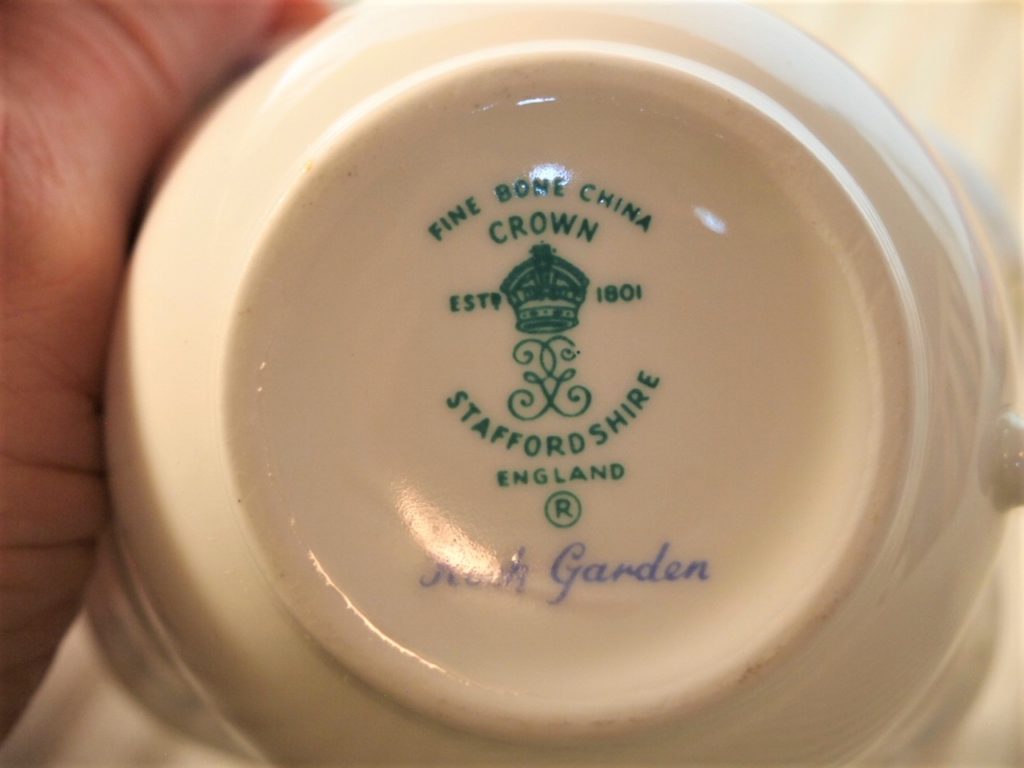
5. Check for the factory mark
Impressed factory marks are a combination of numbers, letters and symbols in conjunction with identifying cartouche for a factory which identifies years of production and company of production. This information is helpful to establish the authenticity and history of the object. Sometimes you will purchase a piece without this marking which is fine but establishing its history will be difficult. Not all are this clear. I will occasionally purchase unmarked pieces. GENERALLY IMPORTANT TO HAVE ON PIECE
Great factory mark on china cup
Other condition issues
A glaze chip is a chip that has occurred on the piece prior to firing and glazing. Factory glazed chips are not post-production chips that have been subsequently repaired and re-glazed. NOT AN ISSUE.
Glaze bubble or glaze pop occurs during the firing process when air bubbles reach the surface of the glaze and burst. NOT AN ISSUE.
Overglaze is a terminology used to describe any decoration that has been applied to a piece once it has been fired. Many times it has sponge gold, enamel colors which have been applied over transfer printed wares. NOT AN ISSUE
Peppering is the minute black specks (grit) of carbon that is sometimes seen in white or light colored glazes. Minor peppering does not usually adversely affect the value of piece. NOT AN ISSUE
Secondly determine the condition of the piece
Excellent condition
If there are no flaws, chips, cracks, discoloration/stains or repairs, the piece is considered to be in excellent condition.
Vintage teacups in excellent condition
Good condition
This generally means that the piece is in very presentable state and may have defects other than how it left the factory. It may have some minor discoloration, minor wear to gold gilding or sponge gold decoration, minor knife and fork scratches, minor restoration
Fair condition
Fair Condition is a terminology used to describe a piece that is not necessarily of great value due to its faults and damages which have occurred over the years but still has some collector and decorative value. Such pieces have been devalued due to damages such as chips, cracks, stains and unprofessional repairs.
Great condition
This is terminology that is usually reserved for a piece in very good shape that is free from major defects, cracks, stains or repairs. Minor surface patina, slight wear or minor surface scratching is acceptable but is worthy of mention when adding further description of condition.
Poor condition
Poor condition is not a terminology that is generally used by sellers or dealers when describing condition. However a piece may be for sale that is exactly in this condition. The reason for selling such a piece may be to preserve it for historical value or because it may be very rare or an only known example available to date.
“As is” condition
This condition is a description used once the seller has described as accurately as possible any problems with a piece. This is the final wording added to a description of condition to assure the buyer that there are some defects or problems and that the piece is being offered for sale at a lesser value than if the piece was in excellent or great condition. It is a phraseology used so that the buyer is not misled.
How do I know if I should purchase this piece of vintage china?
Ask yourself some of the following questions –
Am I gifting the piece or using it for myself?
Am I purchasing this for pleasure and just enjoy or will I be serving others with this piece. I have cups and teapots that I use just for myself. They might not be pristine in their condition, but I enjoy the item and am comfortable with that. If I am using an item for afternoon tea, I will want it to be in excellent condition. This doesn’t necessarily mean expensive.
Do I enjoy the piece and I just like it? This might be enough for me to purchase a piece.
A vintage teacup in excellent condition
What I don’t accept in vintage china –
Chips along the rim of a plate or cup.
Chips in the spout of a teapot are also a no-no for me.
Excessive crazing or crackling inside of a teapot or plate. I might consider one with crazing on the outside if light and limited but not if its in the inside.
Cracking on the inside of a teapot or cup.
Where do I find vintage china?
Anywhere and everywhere! I have favorites in town that I honestly just like to browse because I find it relaxing to smell the antique dust as I say. There are places I know I can find things but they will cycle through as vendors change and things get sold and brought in. So just be aware that this is not always a static inventory.
I love to find different places as I travel (highlighting this in an upcoming blog). Though not quite vintage, you can find some pieces that you might enjoy at places like Home Goods, Tuesday Morning, Marshalls or TJ Maxx.
Online is also a great place to purchase vintage china – you need to be assured that the proprietor maintains the standard you are looking for – you won’t be able to touch and check out the item before purchasing. One of the best places is to go to estate sales where you might find great items that are for sale.
And once the word is out that you are enjoying vintage china, you might also have friends and family that will gift you on occasion. I am blessed with two sisters who love the hunt as I call it and I am frequently gifted with items from them (a great thing for me).
Okay, now grab your flashlight, get that magnifying glass, tuck
the sanitizer in your pocket and get those hands ready. Have fun and enjoy the hunt!
Vintage China purchases with Hamilton Bone China Creamer and Sugar
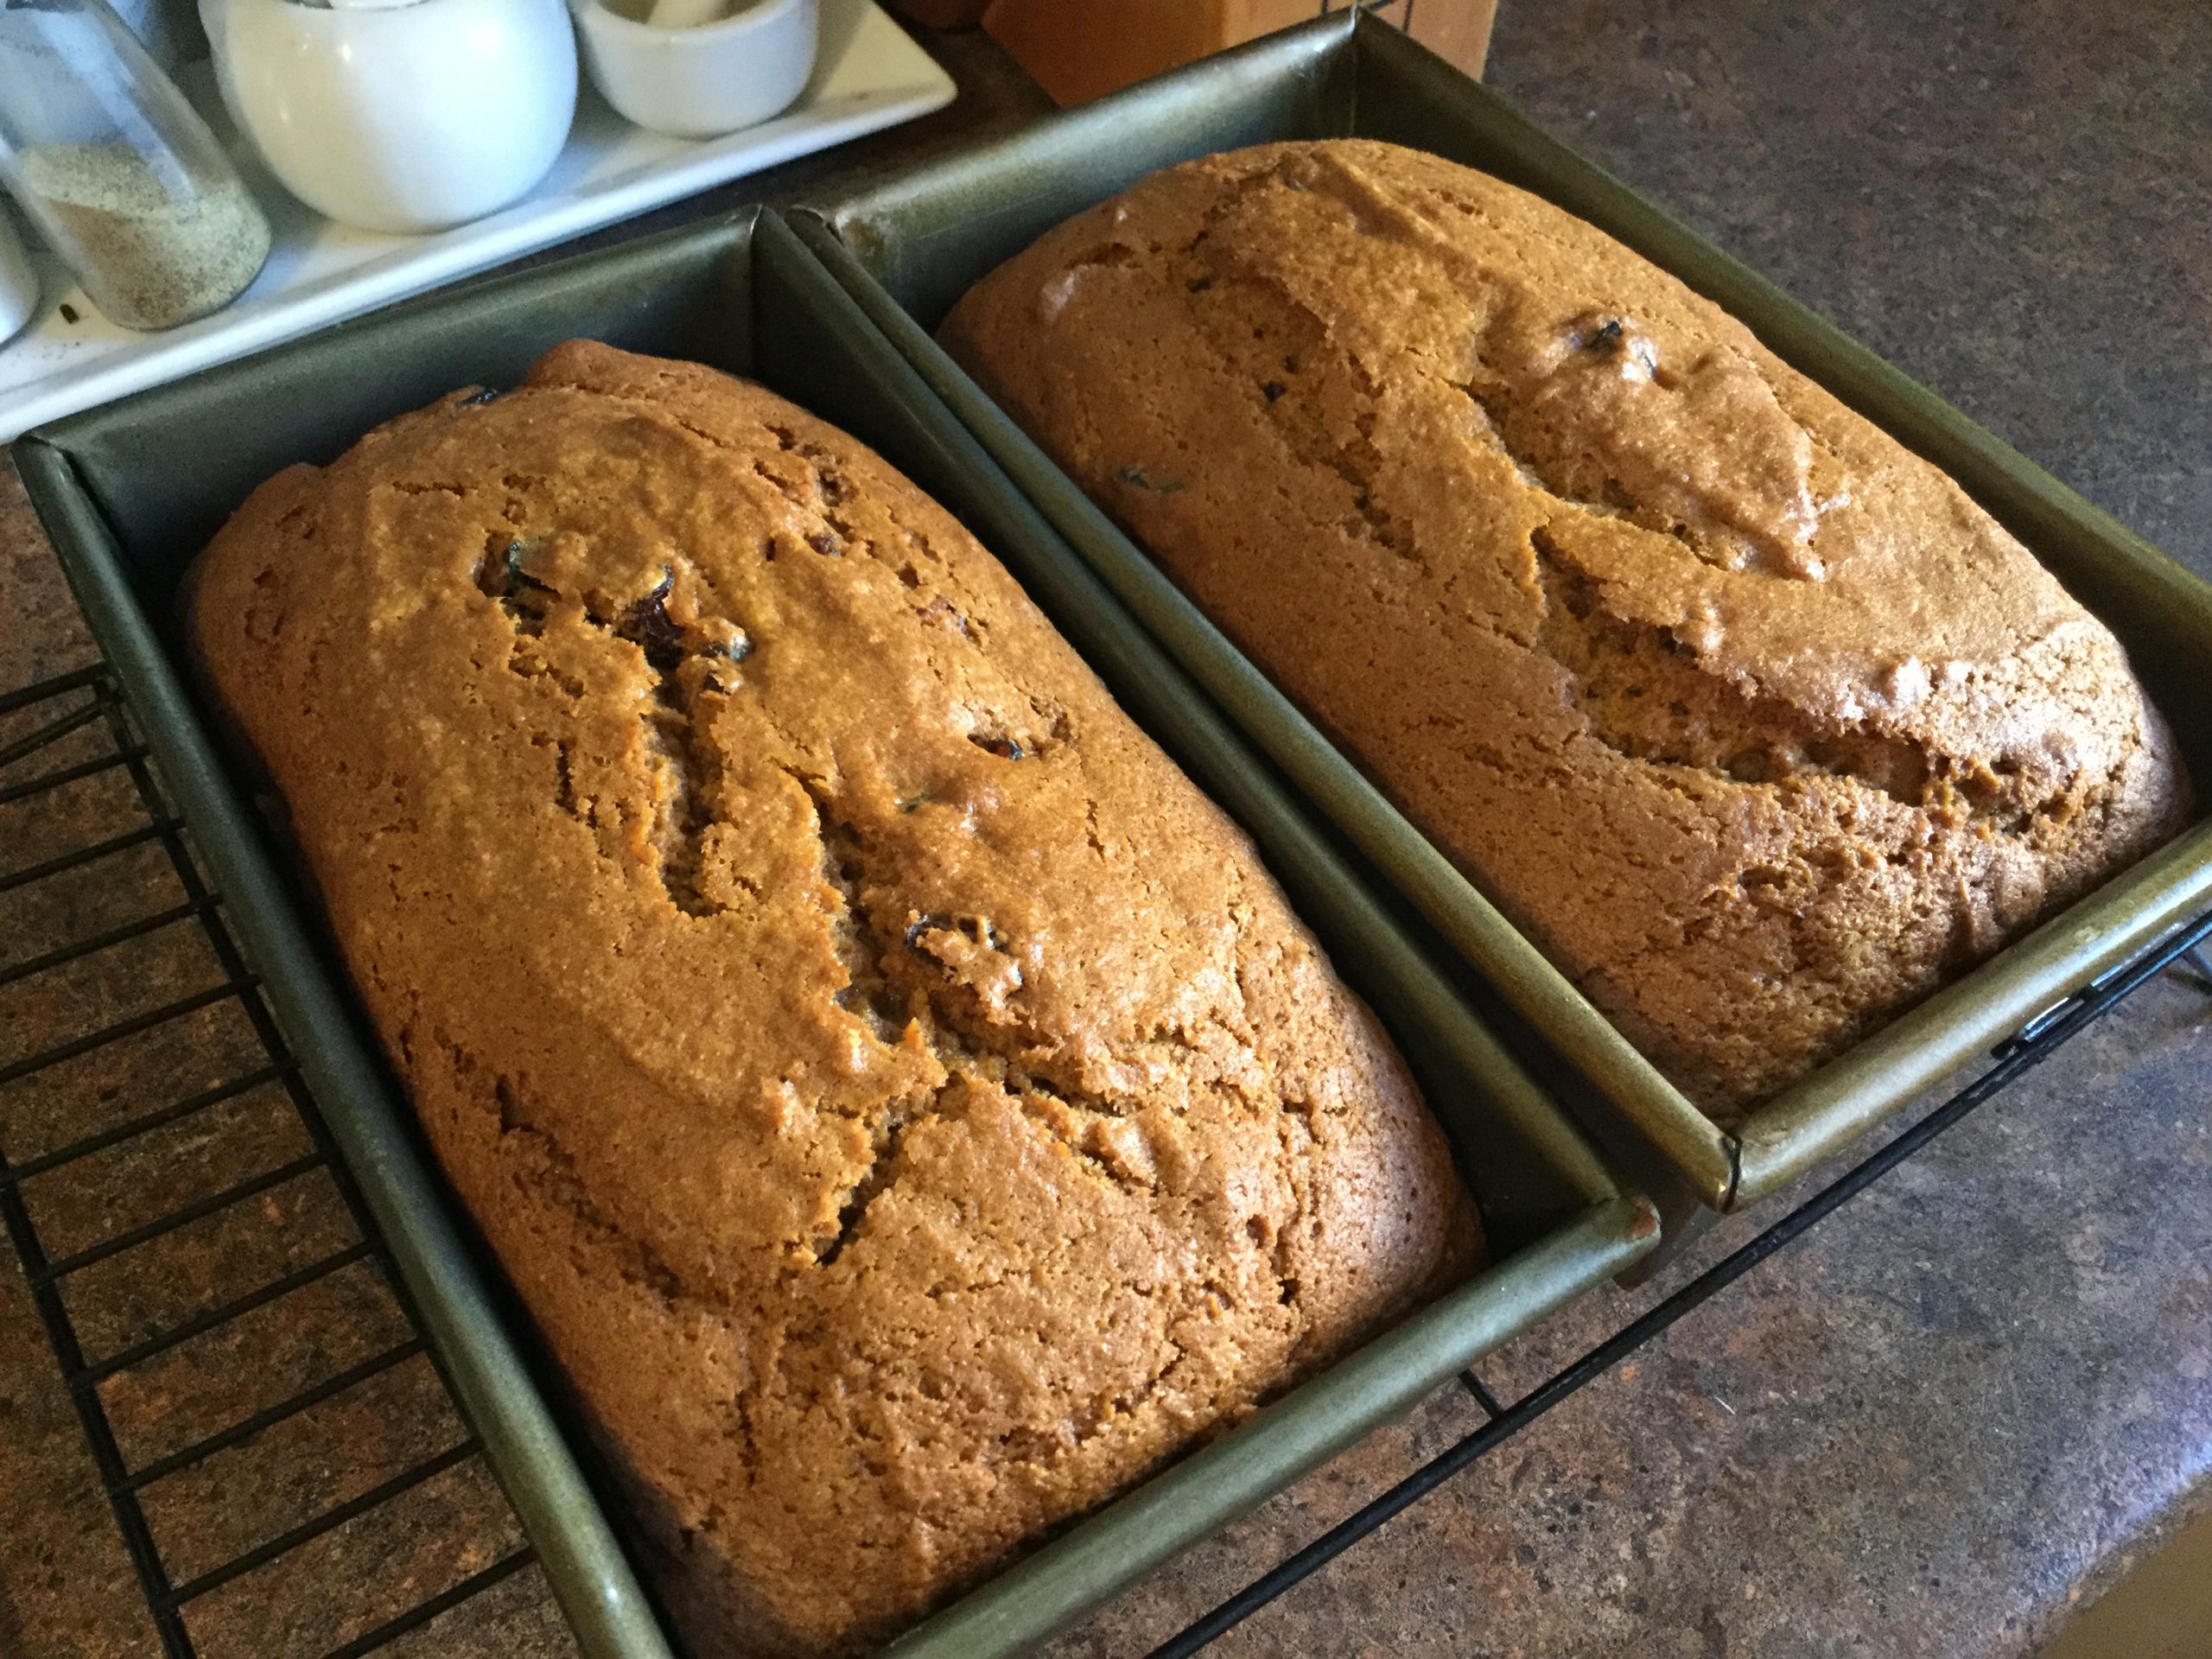
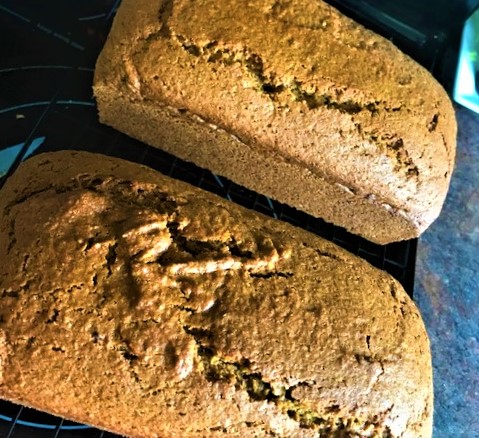
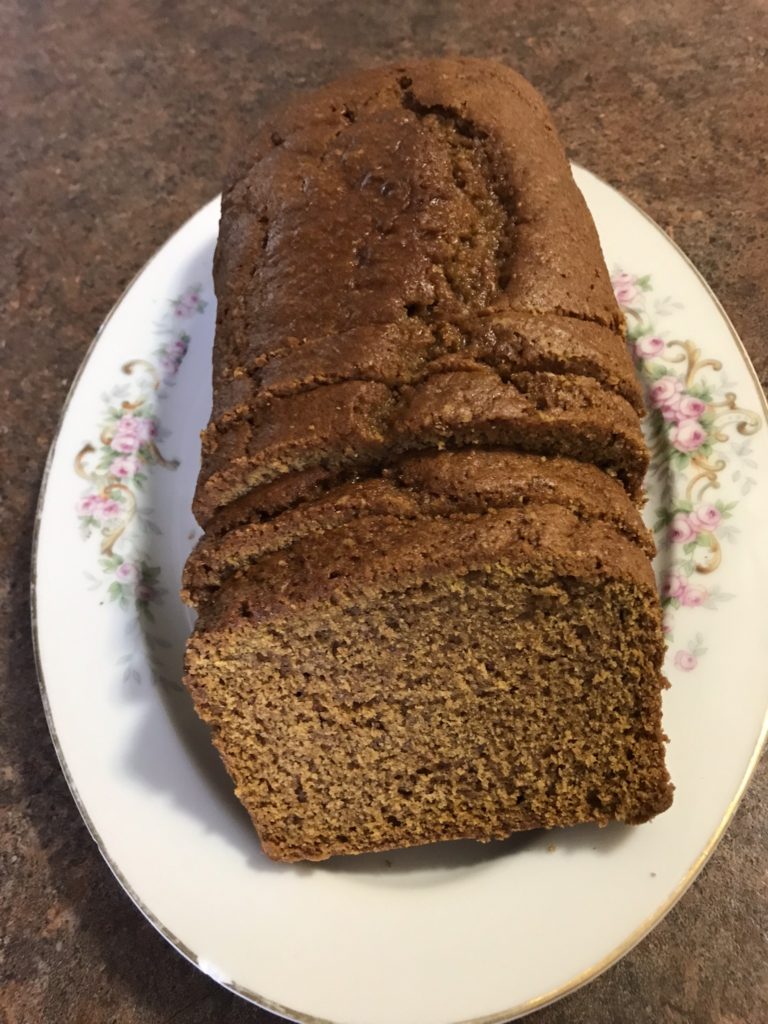
Not just for fall but anytime of the year, this quick bread is easy to put together and yields two delicious loaves. A tried and true recipe, Whole Wheat Pumpkin Bread is a bread you will want to serve, eat, and have on hand. I usually have several loaves in my freezer just for those occasions. No matter the season, the classic smells of the spices in this bread will fill your house and have you thinking cozy. Here are the ingredients.
Ingredients
Whole Wheat Flour
All Purpose Flour
Sugar
Baking Soda
Salt
Nutmeg
Pumpkin Pie Spice
Eggs
Vanilla
Oil
Packed Pumpkin
Cranberries (optional)
Nuts (optional)
Here are the steps
Preheat your oven to 350 degrees. Prepare two 9×5 loaf pans with cooking spray and line the bottom of the pans with parchment paper.
Wet ingredients for Whole Wheat Pumpkin Bread
In your electric mixer, combine the wet ingredients – sugar, eggs, vanilla, oil and pumpkin.
In a separate bowl prepare the dry ingredients – measure out the whole wheat flour, all purpose flour, baking soda, and salt. Don’t forget the key spices. Nutmeg and Pumpkin Pie Spice. I like to grate my own nutmeg – once you use fresh nutmeg, you are sold on the smell and the flavor.
Spices ready for batter
Dry ingredients
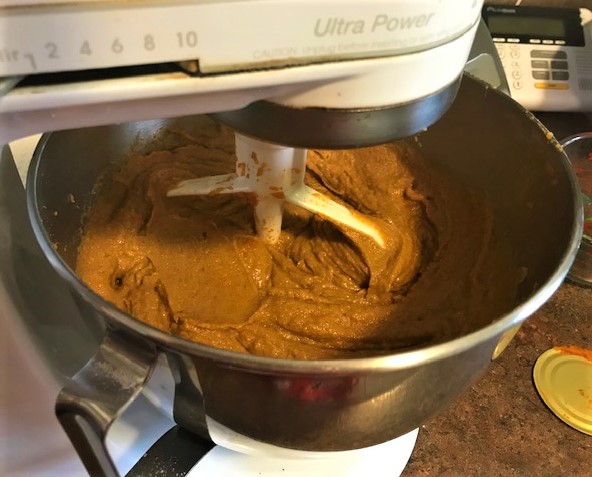
Put the dry ingredients in with the wet ingredients and mix until well combined. If you are adding either cranberries or nuts, add at this time. I don’t usually add either – I like the moist but dense quality of the bread without any additives. The batter will be thick and rich.
Batter in Mixer
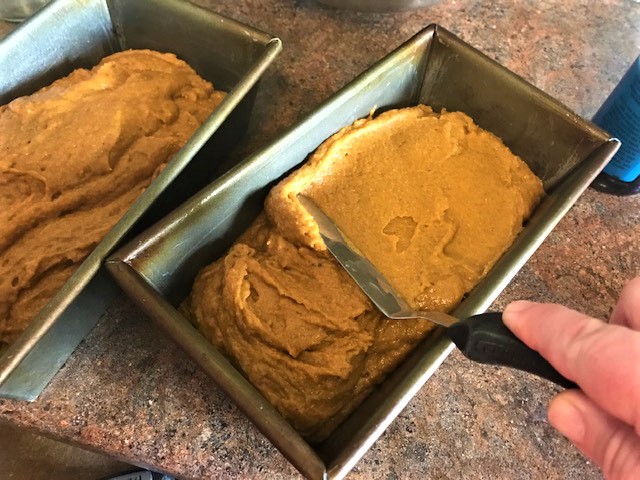
Divide the batter between the two prepared loaf pans. I use an off-set spatula to make sure the batter is even in the pan.
Using off-set spatula to spread batter in pans
Place in the oven and bake for 75 minutes. I begin checking at 70 minutes. Remove when tester or wooden skewer comes out clean. Cool on rack for 20 minutes before removing from pan. Remove from pans and allow to cool to room temperature. Serve or freeze. Store loaves in refrigerator for up to 1 week.
Serving Suggestions
You can serve this bread several ways. Its a favorite of my granddaughters. They frequently request this when they come to visit.
Take a generous slice and put a nice dollop of whipped cream on top with a sprinkle of cinnamon.
Spread with plain cream cheese and top with fresh strawberries
Spread a nice raspberry jam on a thick slice.
I have even served this bread with a fried egg on top and a slice of ham. What a great brunch idea!
Sliced Whole Wheat Pumpkin Bread
Or better yet, just plain….that’s the way my grandkids love it. Enjoy! I know it will become one of your favorites.
These products were used in the making of this recipe
This post contains affiliate links and I may earn compensation when you click on the links at no additional cost to you Look through the products and enjoy!
A quick and easy quick bread with the seasonal flavors mixed with a blend of wheat and white flours. Generally for fall but good for any season. Yields 2 loaves of a moist and delicious bread.
Course Breakfast, quick bread
Keyword fall, pumpkin, quick bread, spices, white flour, whole wheat
Prep Time 15 minutesminutes
Cook Time 1 hourhour15 minutesminutes
Resting Time 10 minutesminutes
Total Time 1 hourhour40 minutesminutes
Servings 12servings
Ingredients
1¾cupwhole wheat flour
1¾cupall purpose flour
2¼cupsugar
2tspbaking soda
2 tspsalt
2 tspnutmeg
1tsppumpkin pie spice
4eggs
1cupoil
1tspvanilla
1can1 lb solid packed pumpkinnot pumpkin pie filling
1cupdried cranberriesoptional – dust with flour before adding
1cupchopped nutsoptional
Instructions
Preheat oven to 350. Prepare 2 – 9×5 loaf pans with cooking spray. Line bottom with parchment paper.
Mix wet ingredients in mixer. Eggs, oil, vanilla, sugar, and pumpkin.
In separate bowl, take all purpose flour, whole wheat flour, baking soda, salt, nutmeg and pumpkin pie spice and combine.
Mix dry ingredients in with wet ingredients. Using paddle, mix until completely combined.
If adding nuts and cranberries, add now. Fold until combined.
Divide batter into two prepared loaf pans.
Bake for 70-75 minutes until tester or wooden skewer comes out clean
Cool on rack for 20 minutes. Then remove from pan and allow to finish cooling.
Notes
I begin testing doneness at the 70 minutes mark. Don’t over bake – it will be dry for sure.This recipe yields two full loaves and freezes excellently. Enjoy!
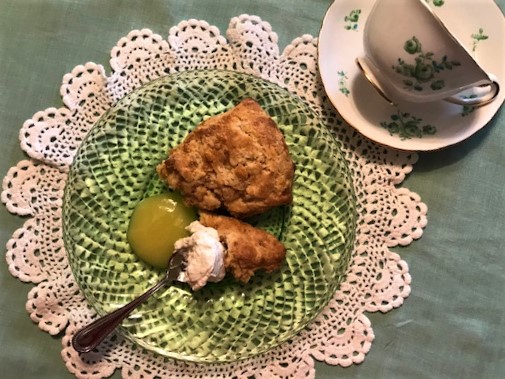
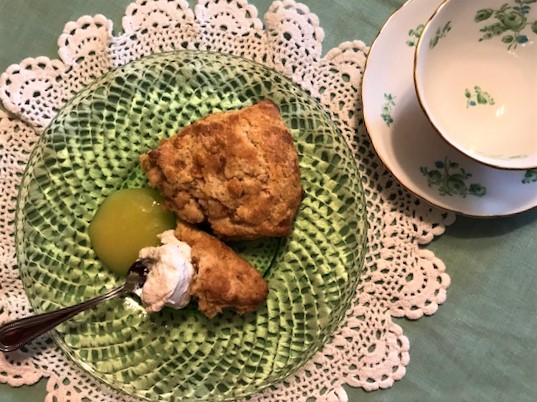
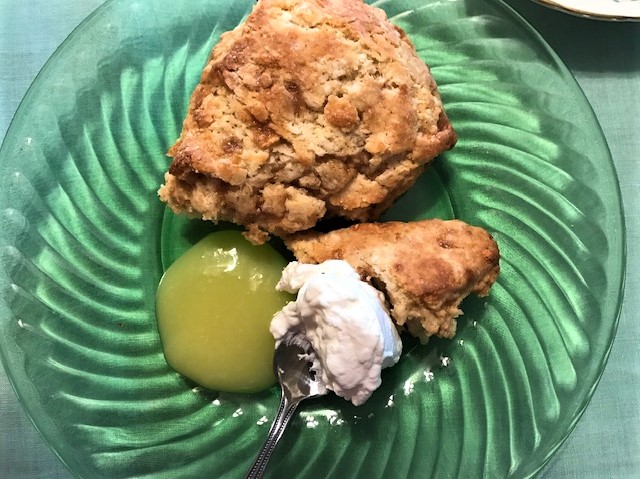
What goes best with a fresh warm scone? In my experience, Devonshire Cream and Lemon Curd. Its traditional and delicious. But what is Devonshire Cream? In short, its a creamy spread that has been topping scones for centuries. Along with a curd or jam, cream is a must for your scone and Devonshire Cream is my choice.
Some Background
Traditionally, any tea enthusiast will tell you that your scone needs to have cream. As early as the 11th century, there is documentation that the monks in Devon England would eat bread with cream and jam. They began serving this to workers and ultimately to other people as what is known today as a Devonshire Cream Tea. Since then, the practice of eating scones with cream and jam has continued. That’s just a snippet of its beginnings.
But what about the cream? Clotted cream originated in Southwest England, either in Cornwall or Devon, depending on who you ask. There are essentially 3 types of creams that have classically been served with scones – Clotted Cream, Devonshire Cream, and Double Cream.
Clotted Cream – A silky, golden-yellow cream made by allowing unpasteurized cow’s milk (traditionally from Jersey cows) to sit for 12-24 hours in shallow pans, then slowing heating it and leaving it to cool for another 12-24 hours. The cream that rises to the surface and “clots” is skimmed off and served with scones, berries, or desserts. Clotted cream has a minimum of 55% butterfat.
Devonshire Cream – Clotted cream produced in the county of Devon, England. Interestingly, in Devon, cream is traditionally spread first on a scone, then topped with jam. In Cornwall, it’s the opposite: jam first, then cream.
Double Cream – A dense cream skimmed from the surface of milk. With a butterfat content of 48%, it is much more decadent than whipped cream but slightly lower than clotted cream.
In the United States, we can obtain clotted cream and Double Cream in import shops, specialty stores or we can attempt to make our own. For me, I have used what some would call a mock Devonshire Cream. For me, its easier than finding unpasturized milk. It has been what I have served for years and have had at several tea rooms around the United States. Sometimes controversial for the purest, this cream presents a reasonable option that provides a delicious spread for your scones. So here’s how you make it!
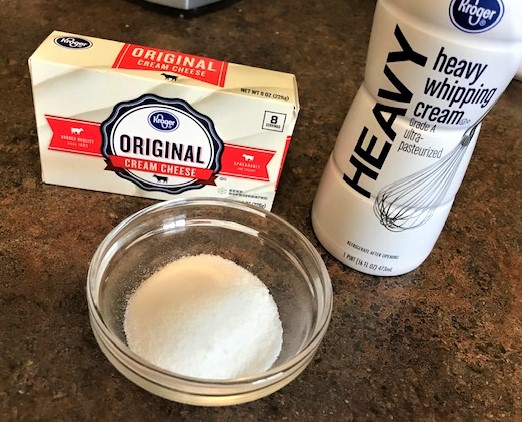
Ingredients
Ingredients for Devonshire Cream
Devonshire Cream is very easy to put together and has very simple ingredients. Heavy whipping cream, cream cheese, and sugar. That’s it. Some recipes have variations – addition of sour cream, vanilla or salt, but I prefer this recipe.
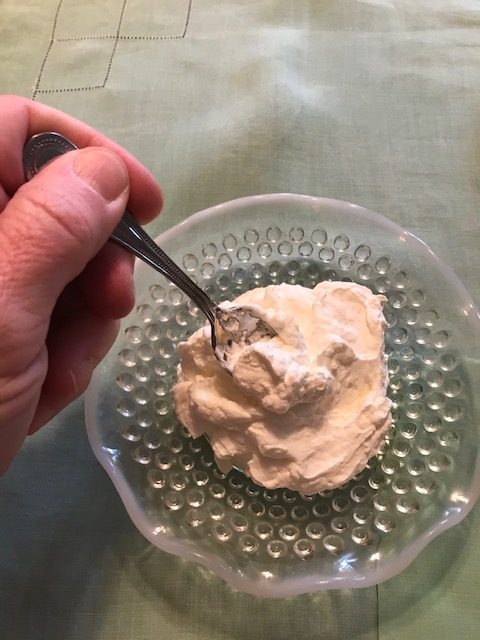
Putting it together
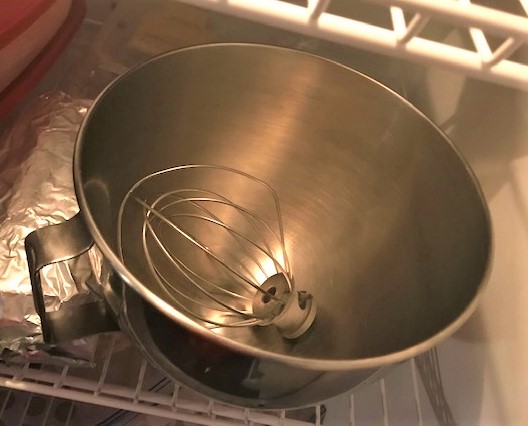
You will need 3 ounces of cream cheese. This needs to be at room temperature. This is critical, so take it out of the refrigerator and make sure its getting soft. If not completely softened, your Devonshire Cream will be lumpy.
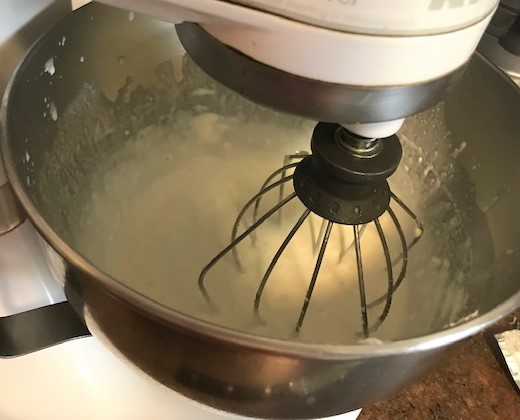
Next, your mixing bowl and whisk need to be very cold. So put them in the freezer while you are waiting for the cream cheese to come to room temperature.
Chilling the mixing bowl and whisk in the freezer
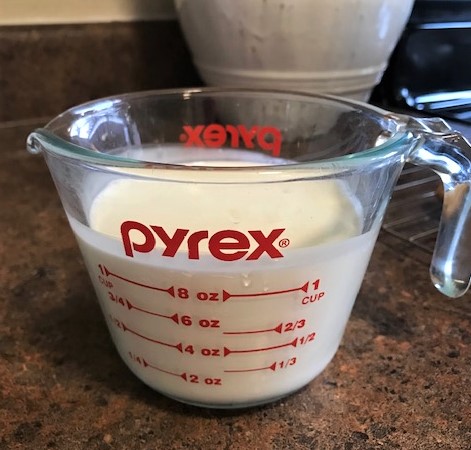
Measure out 1 cup of cream. This also needs to be well chilled. And finally, measure out 1 tbsp of white sugar.
1 cup cream measured out
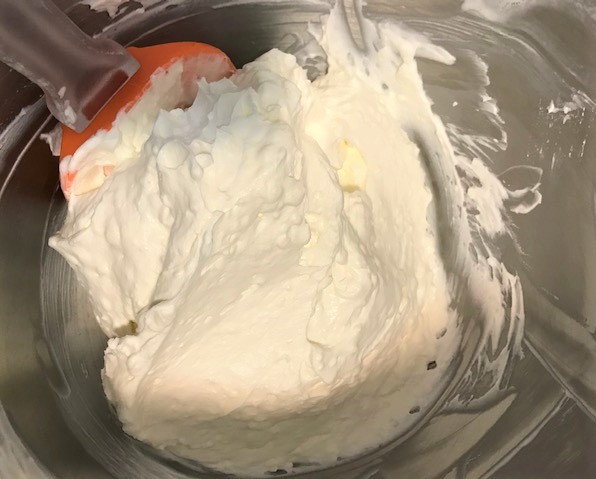
First, place your cream cheese in your mixing bowl and whip until fully smooth. Next, pour in your chilled cream and whip until fully incorporated with the cream cheese. Add the sugar and continue to whip until stiff peaks are formed, almost close to butter.
Once finished, store the Devonshire Cream in the refrigerator for up to one week. It can be frozen – just bring to room temperature and stir to make sure its smooth.
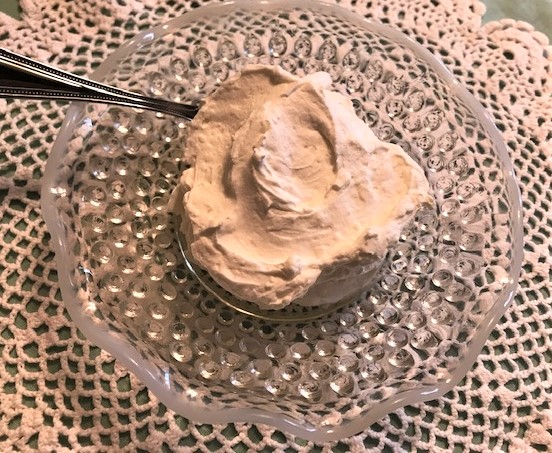
This Devonshire Cream is not overly sweet. When paired with either jam or curd, the slightly tangy cream cheese brings out the flavor of any other topping. If you prefer a sweeter version, just add more sugar as you are whipping the cream. Some recipes will call for powdered sugar rather than white sugar.
How to use your cream
There are several things you can do with your Devonshire Cream.
If serving for an afternoon tea party, scoop several servings into a dish for your guests to enjoy with their scones. Does the cream go first or does the curd or jam go first? Though it doesn’t seem like a critical issue, if you are from Devon, the cream traditionally goes on the top followed by the jam or the curd. If you are from Cornwell, its jam or curd first, followed by the cream. For me? I don’t think I have a preference – just give me a nice scone and include some cream and curd….throw in a cup of tea and I am happy!
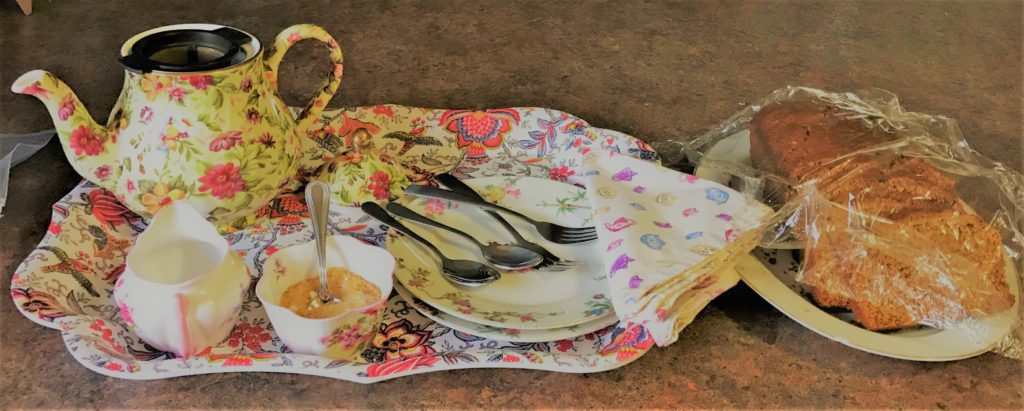
Devonshire Cream is great with delicious quick breads such as my Whole Wheat Pumpkin Bread. You can also use it as a fruit dip. Or as a filling to a cake or even a pavlova. And if you asked my afternoon tea guests, they like to just have a spoonful!
However you enjoy your Devonshire Cream, it makes your tea and scones complete.
The following products were used in the making of this recipe.
This post contains affiliate links and I may earn compensation when you click on the links at no additional cost to you Look through the products and enjoy!